Few things are as frustrating as a leaky water dispenser, especially when that persistent drip emanates directly from the tap. A seemingly minor issue can quickly lead to puddles on your floor, water damage, and unnecessary waste. If you’ve ever found yourself staring at a growing pool beneath your water cooler, wondering how to stem the flow, you’re in the right place. This guide will walk you through the most common causes of water dispenser tap leaks and provide clear, actionable steps to troubleshoot and fix them, helping you restore peace and dryness to your home or office.
Understanding Why Your Water Dispenser Tap Leaks
|
Our Picks for the Best Water Dispenser in 2026
As an Amazon Associate I earn from qualifying purchases.
|
||
| Num | Product | Action |
|---|---|---|
| 1 | Brio Limited Edition Top Loading Water Cooler Dispenser - Hot & Cold Water, Child Safety Lock, Holds 3 or 5 Gallon Bottles - UL/Energy Star Approved |

|
| 2 | Housiwill Countertop Water Dispenser, Top Loading Water Cooler for 1.2 to 5 Gallon, 3 Temperature Settings Room Temperature Water Cold Hot Water Dispenser, Suitable for Home, Office, Dorm Bedside Use |
|
| 3 | Brio Bottom Loading Water Cooler Dispenser for 5 Gallon Bottles - 3 Temperatures with Hot, Room & Cold Spouts, Child Safety Lock, LED Display with Empty Bottle Alert, Stainless Steel |
|
| 4 | Brio Countertop Self Cleaning Bottleless Water Cooler Dispenser with Filtration - Hot Cold and Room Temperature Water. Free Extra Replacement Filters Included - UL/Energy Star Approved |
|
| 5 | Brio 130 Series Top-Load Water Cooler Dispenser for 3- and 5-Gallon Bottles, Hot & Cold, Spill-Free Loading, Child Safety Lock, Energy Star 3.0, Black |
|
| 6 | Water Jug Pump for 5 Gallon Bottle – Portable Electric USB-C Charging Dispenser, Dual Powerful Motors, Fast Flow, Fits 2-5 Gallon Jugs – Ideal for Home, Office, Camping, RV, Black |
|
| 7 | Brio Commercial Grade Bottleless Ultra Safe Reverse Osmosis Drinking Water Filter Water Cooler Dispenser-3 Temperature Settings Hot, Cold & Room Water - UL Approved – Point of Use |
|
| 8 | Brita UltraMax Large Water Dispenser With Standard Filter, BPA-Free, Reduces Copper, Cadmium and Mercury Impurities, Lasts 2 Months or 40 Gallons, Includes 1 Filter, Kitchen Accessories, Large 27-Cup |
|
| 9 | Primo Bottom-Loading Self-Sanitizing Water Dispenser - 2 Temp (Hot-Cold) Water Cooler Water Dispenser for 5 Gallon Bottle w/Child Safety Lock, Black and Stainless Steel |
|
| 10 | Igloo Top Loading Water Cooler with Removable Tray & Energy-Saving Features - Water Tower with Hot, Cold Temperature Settings- Water Dispenser Fits 3 & 5-Gallon Jugs with Child Safety Lock- Stainless |
|
A dripping water dispenser tap isn’t just an annoyance; it’s a sign that something isn’t quite right within the dispensing mechanism. Several factors can contribute to this common problem, ranging from simple wear and tear to more complex internal issues. Understanding these underlying causes is the first step toward a successful repair.
One of the most frequent culprits is worn or damaged spigot components. The tap, also known as a spigot or faucet, contains internal seals and O-rings designed to create a watertight barrier when closed. Over time, continuous use can cause these rubber components to degrade, flatten, crack, or become brittle, losing their ability to seal effectively. Internal cracks in the plastic body of the spigot itself, sometimes resulting from overtightening during installation or general wear, can also lead to insidious leaks.
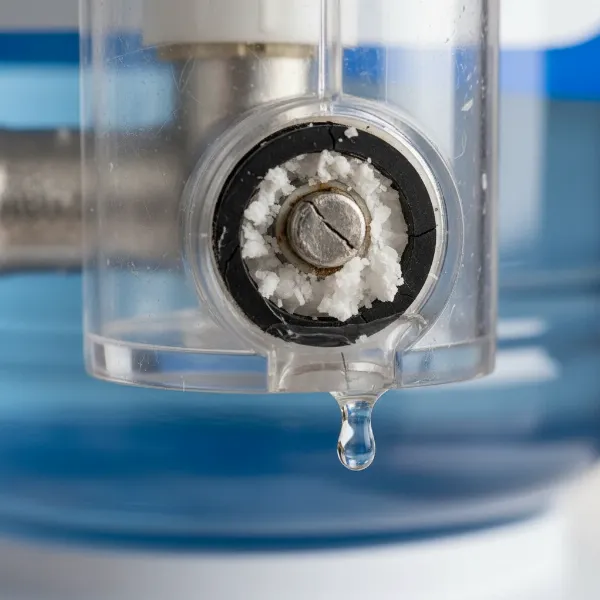 Close-up of a leaking water dispenser tap showing worn seals and mineral buildup
Another common reason is loose connections and fittings. The spigot is typically screwed into the dispenser’s reservoir or water line. If this connection becomes loose, water can seep through the gaps. Similarly, internal tubing or fittings that connect to the tap mechanism might loosen, allowing water to escape before it even reaches the spout, often manifesting as a leak from the tap’s base.
Mineral buildup and clogging can also play a significant role. Hard water deposits (limescale) can accumulate within the spigot’s valve mechanism or the outlet path. This buildup can prevent the valve from closing completely, creating small channels for water to drip through even when the tap is in the “off” position. Cleaning these deposits is crucial for smooth operation.
Sometimes, the leak isn’t a mechanical failure but an airlock in the system. After changing a water bottle or replacing a filter, air can get trapped in the water lines. This trapped air can cause inconsistent pressure or prevent the system from fully sealing, leading to a steady drip from the tap. Releasing this air is usually a quick fix.
Finally, while not directly a tap issue, improper bottle installation or using incompatible water bottles can indirectly contribute to leaks. If a bottle isn’t seated correctly, it can create excessive pressure or lead to an overflow within the dispenser’s reservoir. This overflow might then find its way to external points, including the tap area, mimicking a direct tap leak.
Step-by-Step Troubleshooting: Pinpointing the Leak Source
Before you can fix a leak, you need to identify precisely where the water is coming from and what might be causing it. A methodical approach will save you time and prevent unnecessary repairs.
Start with a thorough visual inspection. Unplug your water dispenser and carefully examine the tap area. Look for visible cracks in the plastic spigot, signs of corrosion around the base where it attaches to the dispenser, or any water streaks indicating a leak path. Inspect the area behind the tap inside the dispenser if possible, as internal leaks can sometimes drip out through the tap.
Next, check bottle placement. If you have a top-loading dispenser, remove the water bottle and then re-seat it, ensuring it’s firmly and correctly inserted into the piercing probe. For bottom-loading units, verify that the water line from the bottle is securely connected and that the bottle itself isn’t cracked or damaged, as even a hairline fracture can cause issues. A simple bottle replacement can sometimes resolve the problem entirely, especially if the leak appeared after a recent change.
Finally, test for air traps. If you’ve recently installed the dispenser, changed the water bottle, or replaced a filter, air pockets can cause dripping. To resolve this, place a large container under the tap and press the dispensing lever, allowing water to flow until a consistent stream emerges. Continue dispensing for several minutes, perhaps up to 15 liters, to ensure all trapped air is flushed from the system.
DIY Fixes for a Leaking Water Dispenser Tap
Once you’ve identified the likely cause, many water dispenser tap leaks can be resolved with simple DIY solutions. Always ensure the dispenser is unplugged and the water bottle is removed before attempting any repairs.
Begin by tightening loose connections. If your visual inspection revealed any wobbly spigots or connections, use a wrench or pliers to gently tighten them. Be cautious not to overtighten, especially with plastic fittings, as this can cause new cracks and exacerbate the problem. A snug fit is usually sufficient to stop minor seepage.
If you suspect mineral buildup, cleaning mineral deposits is essential. You can often remove the spigot for better access (see spigot replacement steps below). Use a descaling solution, like a vinegar-water mix, to clean any visible mineral accumulation within the tap mechanism and surrounding areas. Ensure all parts are thoroughly rinsed before reassembly.
For leaks caused by degraded seals, replacing worn O-rings and seals is the key. You might need to disassemble the faucet body to access these small rubber components. Look for signs of flattening, cracking, or stiffness. Replacement O-rings and washers can often be purchased from hardware stores or directly from the dispenser manufacturer. For some glass dispensers, common garden hose seals can even serve as an effective, low-cost replacement if the original seals are inadequate.
If the spigot itself is cracked or severely worn, or if the internal seals are inaccessible, you may need to replace the entire water dispenser spigot. This process is generally straightforward:
- Safety First: Unplug and Drain: Always unplug the dispenser from the power outlet. If your unit dispenses hot water, turn off the hot tank switch on the back of the unit. Remove the water bottle and drain all remaining water from both the hot and cold taps into a container.
- Removing the Old Spigot: Locate the coupling or threaded nut that holds the spigot in place, usually found on the inside of the dispenser or behind the front panel. Using an adjustable wrench or pliers, slowly unscrew this coupling counter-clockwise until the spigot is loose. You may need to gently twist and pull the old spigot from the front to remove it.
- Installing the New Spigot: Inspect the new spigot to ensure it comes with fresh rubber washers or O-rings. If not, transfer the new washers from the old spigot or acquire new ones. Insert the new spigot into the opening from the outside, then secure it from the inside by hand-tightening the coupling clockwise. Finish with a wrench, tightening until snug but being careful not to overtighten, especially if it’s a plastic fitting.
- Flushing and Testing: After replacement, pour about a gallon of clean tap water into the dispenser’s reservoir (if applicable). Hold down both spigots to flush the system and ensure a steady flow. Load your regular water bottle. If you have a hot tank, dispense 2-3 cups of water from the hot tap to prime it before turning the hot tank switch back on. Plug in the dispenser and monitor for any drips over the next hour.
 Hands demonstrating the process of replacing a water dispenser spigot with a new one
“Most water dispenser leaks from the tap are due to either a degraded seal or a loose connection. Addressing these early on can prevent more significant issues and extend the life of your unit.” – Alex Chen, Lead Technician, AquaFlow Solutions.
Preventative Maintenance for a Drip-Free Dispenser
Proactive care can significantly reduce the likelihood of your water dispenser tap developing leaks. Integrating a few simple maintenance habits into your routine can keep your unit running smoothly and drip-free.
Regular cleaning and descaling are paramount. Aim to clean your dispenser every 3-6 months, or more frequently in hard water areas. This involves draining the unit, cleaning the reservoir with a food-grade cleaning solution or a vinegar solution, and thoroughly rinsing. This process helps prevent the buildup of mineral deposits that can interfere with the tap’s sealing mechanism.
Proper bottle handling is another critical aspect. Always ensure water bottles are installed correctly and seated firmly onto the dispenser. Avoid forcing bottles into place, which can damage the dispenser’s internal probe or crack the bottle itself. Only use bottles compatible with your dispenser model to ensure a proper fit and seal.
Perform periodic inspections of your dispenser’s taps and connections. Take a moment to check for any signs of wear on the spigots, such as cracks or stiffness, and gently test connections to ensure they are secure. Early detection of a loose fitting or a stiff tap can allow for a quick fix before a full-blown leak develops.
Finally, protecting against freezing is crucial, especially in colder climates or unheated spaces. Water expands when it freezes, which can cause internal tanks, lines, and fittings to crack, leading to leaks. Position your dispenser away from cold drafts, windows, or unheated rooms, and consider insulating the unit if necessary to prevent cold-related damage.
When to Call a Professional
While many water dispenser leaks from the tap can be fixed with DIY methods, there are instances when professional help is advisable. If you’ve tried the troubleshooting and repair steps outlined above and the leak persists, or if you identify a problem beyond a simple tap fix, it’s time to call in an expert.
Issues like significant internal tank cracks, persistent leaks from the base of the unit (not directly from the tap), or electrical problems should always be handled by a qualified technician. Attempting complex internal repairs without the necessary expertise can void warranties, cause further damage, or even pose safety risks. A professional can accurately diagnose intricate problems and carry out repairs that ensure the safe and efficient operation of your water dispenser.
Conclusion
A leaking water dispenser tap can be a vexing household issue, but armed with the right knowledge, it’s often a problem you can tackle yourself. By understanding the common culprits—from worn seals and loose connections to mineral buildup and trapped air—you can effectively troubleshoot and implement DIY fixes like tightening fittings, cleaning, or replacing a faulty spigot. Regular cleaning, careful bottle handling, and routine inspections are your best defense against future drips, ensuring your water dispenser remains a convenient source of hydration. If, however, the drip persists despite your best efforts, don’t hesitate to consult a professional to safeguard your investment and peace of mind. What’s your go-to maintenance tip for keeping your water dispenser in top condition?
Frequently Asked Questions
Is a few drops of water normal after dispensing from a water dispenser?
It is considered normal for a water dispenser to drip a few drops (typically less than 1cc) after use, especially with newly installed units as components expand and contract with temperature changes. However, a steady or continuous drip indicates an underlying issue that needs attention.
How often should I clean my water dispenser to prevent leaks?
To prevent mineral buildup and maintain hygiene, it’s recommended to clean your water dispenser every 3 to 6 months. Regular cleaning helps ensure that the tap mechanism and internal components remain free of deposits that can cause leaks.
Can I use any universal spigot to replace a broken one on my water dispenser?
Not all spigots are universal. While many standard water dispensers use common threaded mounting systems, it’s crucial to match both the physical dimensions (like threading and outer diameter) and the activation mechanism (lever vs. push-button) of the replacement spigot to your dispenser model for a proper, leak-free fit.
What tools do I need to replace a water dispenser spigot?
To replace a water dispenser spigot, you will typically need an adjustable wrench or pliers to loosen and tighten the coupling nut. You might also need a flathead screwdriver or a pick to help remove old seals, and new replacement O-rings or seals for the new spigot.