As an administrator with over a decade of experience in water dispensers and water purification, I’ve seen countless questions about getting that perfect sip—whether it’s refreshingly cold or delightfully hot. Achieving your ideal water temperature from your water cooler is simpler than you might think, though the method can vary depending on your unit’s design. This guide will walk you through the common ways to adjust your water cooler’s temperature, ensuring every drink is exactly to your liking.
Understanding Your Water Cooler’s Temperature Control
Before you dive into adjustments, it’s helpful to know that water coolers come with different types of temperature controls. Some feature a traditional manual thermostat dial, usually for the cold water, while more modern units boast intuitive digital control panels that let you fine-tune both hot and cold settings. Understanding which type your water cooler has is the first step toward customized hydration.
Why Adjust Your Water Cooler’s Temperature?
|
Our Picks for the Best Water Dispenser in 2026
As an Amazon Associate I earn from qualifying purchases.
|
||
| Num | Product | Action |
|---|---|---|
| 1 | Brio Limited Edition Top Loading Water Cooler Dispenser - Hot & Cold Water, Child Safety Lock, Holds 3 or 5 Gallon Bottles - UL/Energy Star Approved |

|
| 2 | Brio Commercial Grade Bottleless Ultra Safe Reverse Osmosis Drinking Water Filter Water Cooler Dispenser-3 Temperature Settings Hot, Cold & Room Water - UL Approved – Point of Use |
|
| 3 | Water Jug Pump for 5 Gallon Bottle – Portable Electric USB-C Charging Dispenser, Dual Powerful Motors, Fast Flow, Fits 2-5 Gallon Jugs – Ideal for Home, Office, Camping, RV, Black |
|
| 4 | Brita UltraMax Large Water Dispenser With Standard Filter, BPA-Free, Reduces Copper, Cadmium and Mercury Impurities, Lasts 2 Months or 40 Gallons, Includes 1 Filter, Kitchen Accessories, Large 27-Cup |
|
| 5 | Brio 130 Series Top-Load Water Cooler Dispenser for 3- and 5-Gallon Bottles, Hot & Cold, Spill-Free Loading, Child Safety Lock, Energy Star 3.0, Black |
|
| 6 | Housiwill Countertop Water Dispenser, Top Loading Water Cooler for 1.2 to 5 Gallon, 3 Temperature Settings Room Temperature Water Cold Hot Water Dispenser, Suitable for Home, Office, Dorm Bedside Use |
|
| 7 | Primo Bottom-Loading Self-Sanitizing Water Dispenser - 2 Temp (Hot-Cold) Water Cooler Water Dispenser for 5 Gallon Bottle w/Child Safety Lock, Black and Stainless Steel |
|
| 8 | Brio Bottom Loading Water Cooler Dispenser for 5 Gallon Bottles - 3 Temperatures with Hot, Room & Cold Spouts, Child Safety Lock, LED Display with Empty Bottle Alert, Stainless Steel |
|
| 9 | Igloo Top Loading Water Cooler with Removable Tray & Energy-Saving Features - Water Tower with Hot, Cold Temperature Settings- Water Dispenser Fits 3 & 5-Gallon Jugs with Child Safety Lock- Stainless |
|
| 10 | Brio Countertop Self Cleaning Bottleless Water Cooler Dispenser with Filtration - Hot Cold and Room Temperature Water. Free Extra Replacement Filters Included - UL/Energy Star Approved |
|
People adjust their water cooler’s temperature for various reasons. Perhaps you prefer your cold water extra chilly on a hot day, or your hot water just a bit warmer for that perfect cup of tea. Sometimes, environmental factors like room temperature can affect the perceived temperature of your dispensed water, prompting a need for minor tweaks. Knowing how to make these adjustments empowers you to always enjoy water at your preferred setting.
Method 1: Adjusting Temperature with a Manual Thermostat Dial (Cold Water)
Many standard water coolers, particularly older or more basic models, feature a manual thermostat dial for controlling the cold water temperature. This dial is typically located on the back of the unit.
Step-by-step guide to adjusting cold water temperature:
- Locate the Thermostat: First, turn your water cooler around to access the back panel. Look for a small dial, often about the size of a quarter, usually positioned near the bottom or beneath the cold water tank, often on the left side. It will have a metal groove in the center.
- Prepare Your Tool: You will need a flathead screwdriver to make the adjustment.
- Make Incremental Adjustments: Insert the flathead screwdriver into the metal groove of the dial. To make the water colder, turn the dial clockwise. To make it less cold (warmer), turn it counter-clockwise. It’s crucial to make very small adjustments—a quarter of a turn at a time is often sufficient.
- Wait and Test: After each adjustment, give your water cooler at least an hour for the temperature to stabilize. Then, dispense a cup of water and test its temperature. If it’s still not to your liking, repeat the process with another small adjustment. Patience is key to finding your ideal setting.
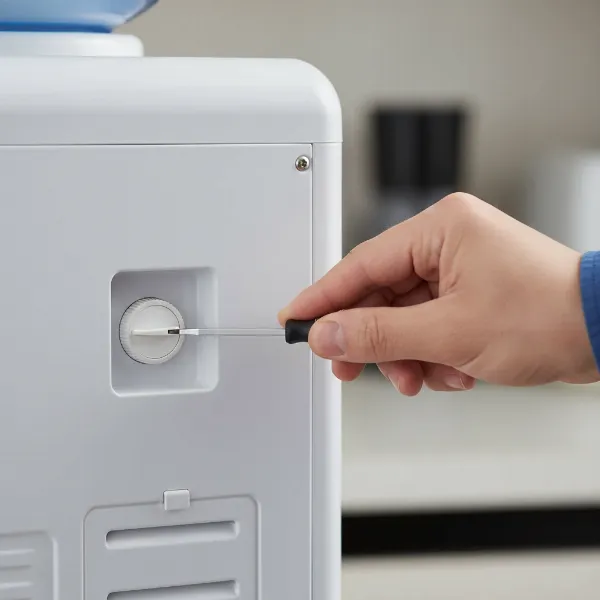 Adjusting a water cooler's manual thermostat dial with a flathead screwdriver on the back panel.
“A common mistake is over-adjusting the thermostat dial. Always make small, quarter-turn changes and allow ample time for the temperature to respond before making further tweaks. This prevents the water from becoming too cold or too warm unexpectedly.” – John Smith, Water Dispenser Technician
Method 2: Adjusting Temperature with Digital Controls (Hot and Cold Water)
Modern water coolers often come equipped with digital control panels, offering more precise and user-friendly temperature adjustments for both hot and cold water. These controls are usually found on the front or top of the unit.
Step-by-step guide to adjusting digital controls:
- Identify the Control Panel: Locate the digital display and control buttons on your water cooler. These typically include up and down arrows, a “select” or “key” button, and indicators for hot and cold temperatures.
- Enter Adjustment Mode: For cold water, you might need to press and hold the “down arrow” button for approximately 3 seconds. For hot water, press and hold the “up arrow” button for about the same duration. The display numbers, usually under the corresponding temperature indicator (red for hot, blue for cold), should begin to flash, indicating you are in adjustment mode.
- Set Desired Temperature: Use the up and down arrow buttons to increase or decrease the temperature to your desired level. Digital displays often show the temperature in degrees Celsius or Fahrenheit, allowing for precise control.
- Confirm Your Selection: Once you have reached your preferred temperature, press the “select” or “key” button to confirm your setting. The flashing numbers will usually stop, and the display will return to its normal operational state.
- Allow Time to Stabilize: As with manual adjustments, give the unit some time (typically 30 minutes to an hour) to reach the newly set temperature before checking.
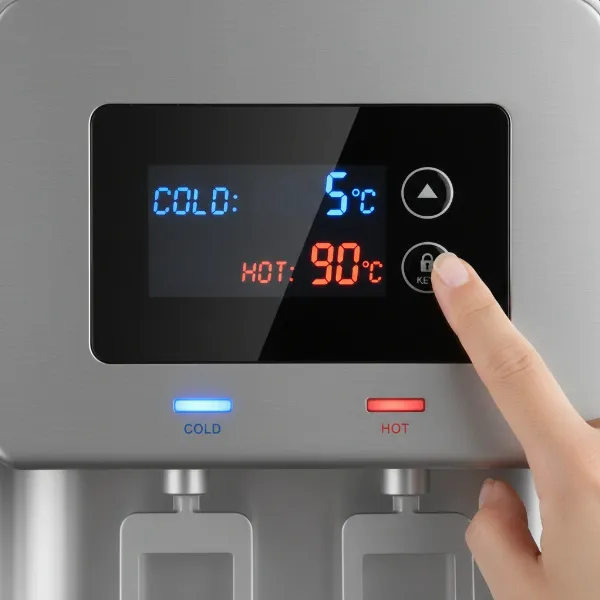 User interacting with a modern water cooler's digital control panel to adjust temperature settings.
Digital controls often provide a wider range of customizable temperatures, with cold water typically adjustable to around 5-8 degrees Celsius (41-46 degrees Fahrenheit) and hot water up to 92 degrees Celsius (198 degrees Fahrenheit) for instant coffee or tea.
When You Can’t Adjust the Temperature (and Why)
While many water coolers offer temperature adjustment, it’s important to note that not all models provide this feature. Some, especially certain bottom-loading dispensers, are designed with pre-set temperatures that cannot be externally adjusted by the user. If you’ve checked the back panel for a dial and the front for digital controls without success, your unit might fall into this category. In such cases, the manufacturer has optimized the cooler for what it considers the ideal hot and cold temperatures.
Troubleshooting Common Water Cooler Temperature Issues
Sometimes, your water cooler might not be cooling or heating properly, even after attempting adjustments. Here are some common troubleshooting steps:
- Power Supply Check: Ensure your unit is fully plugged into a working outlet and the power switches on the back are in the “on” position. Loose connections or an accidentally unplugged unit are simple but frequent causes of issues. If the unit has indicator lights, check if they are illuminated. If not, try resetting the cooler by unplugging it, waiting 30 seconds, and then plugging it back in and turning it on.
- Overuse: A water cooler that has been heavily used might need time to “catch up.” If you’ve dispensed a large quantity of hot or cold water recently, the unit will require a period to reheat or re-chill the reservoir. Give it about 20-30 minutes before testing again.
- Internal Baffle (for Hot Water): If your hot water isn’t heating, an internal baffle might have become dislodged when you changed the water bottle. This baffle separates hot and cold water. To fix it, remove the water bottle, drain any remaining water, and look for a flat, circular disc in the well. Firmly place it back in the center and replace the water bottle.
- Poor Ventilation: Water coolers need adequate airflow to function efficiently. Ensure there’s at least 10 cm (about 4 inches) of space between the back of the cooler and the wall to allow for proper heat dissipation. Blocked vents can lead to ineffective cooling or heating.
- Dirty Filters (for Filtration Models): If your water cooler includes a filtration system, clogged or dirty filters can restrict water flow, impacting the unit’s ability to cool or heat water efficiently. Regularly replacing filters according to manufacturer recommendations is crucial for optimal performance.
- Compressor or Refrigerant Problems: If, after trying all the above, your cold water is still not cold, there might be an issue with the compressor or a refrigerant leak. These are complex problems that typically require professional service or replacement of the unit.
Maintenance Tips for Optimal Temperature
Regular maintenance not only prolongs the life of your water cooler but also ensures it consistently delivers water at your desired temperature.
- Regular Cleaning: Clean your water cooler regularly, especially the drip tray and dispensing nozzles, to prevent mineral buildup and ensure hygienic operation. Follow the manufacturer’s guidelines for deep cleaning the water tanks.
- Proper Placement: Always place your water cooler on a level surface away from direct sunlight and heat sources. Good ventilation, as mentioned, is critical for efficient cooling.
- Avoid Overloading: While water coolers are designed for convenience, excessive, continuous dispensing can strain the cooling/heating system. Allow the unit brief recovery times if demand is unusually high.
In summary, adjusting the temperature on your water cooler is a straightforward process, whether you have a manual thermostat dial or a digital control panel. By understanding your unit’s features and performing basic troubleshooting and maintenance, you can consistently enjoy water at your perfect temperature.
Frequently Asked Questions
Can I adjust both hot and cold water temperatures on all water coolers?
No, not all water coolers allow for adjusting both hot and cold temperatures. While many modern units with digital controls offer this flexibility, traditional models typically only have a manual thermostat dial for the cold water.
How long does it take for a water cooler to reach the new temperature after adjustment?
After adjusting the temperature, it usually takes between 30 minutes to an hour for the water cooler to fully stabilize and reach the newly set temperature. It’s best to wait this period before testing the water.
Why is my water cooler not getting cold/hot enough even after adjusting the thermostat?
Several factors can cause this, including a loose power connection, heavy usage, poor ventilation, a dislodged internal baffle (for hot water), or dirty filters. If these troubleshooting steps don’t work, there might be an issue with the compressor or refrigerant, which requires professional attention.