In a world increasingly focused on health and convenience, water dispensers have become indispensable in many homes and offices, offering instant access to refreshing water. Yet, many overlook a crucial aspect of owning these devices: proper cleaning and sanitization. Just like any appliance that handles food or drink, a water dispenser can become a breeding ground for bacteria, mold, and algae if neglected. Ensuring your water dispenser is impeccably clean and regularly sanitized isn’t just about aesthetics; it’s vital for your health, ensuring every sip is pure and safe. This comprehensive guide will walk you through the essential steps to keep your water dispenser in pristine condition, guaranteeing fresh, clean water every time.
Why Regular Cleaning and Sanitization of Your Water Dispenser is Crucial
Regular cleaning and sanitization are paramount to maintaining a healthy hydration source. Over time, mineral deposits from water can build up, and microorganisms like bacteria, mold, and yeast can flourish in damp environments, particularly in areas like the water reservoir, spigots, and drip tray. These contaminants can not only affect the taste and quality of your water but can also pose significant health risks, potentially leading to gastrointestinal issues or other illnesses. A properly cleaned and sanitized water dispenser prevents the accumulation of these harmful elements, prolonging the life of your appliance and, most importantly, protecting your well-being.
How Often Should You Clean Your Water Dispenser?
For optimal hygiene, it’s recommended to clean and sanitize your water dispenser at least every six weeks, or each time you replace an empty water bottle. If your dispenser is heavily used, or if you notice any unusual tastes, smells, or visible residue, a more frequent cleaning schedule would be beneficial. Establishing a routine helps prevent buildup and ensures continuous access to clean, safe drinking water.
Essential Supplies You’ll Need for the Cleaning Process
Before you begin, gather all the necessary tools and cleaning agents. Having everything at hand will make the process smoother and more efficient.
- Gloves: To protect your hands from cleaning solutions.
- Mild Dish Soap: For general external cleaning.
- White Vinegar or Bleach (Food-Grade): These are key sanitizing agents. Vinegar is a natural alternative, while bleach offers potent disinfection.
- Soft Cloths or Sponges: Non-abrasive materials to wipe surfaces without scratching.
- Small Brush (e.g., Bottle Brush or Toothbrush): Ideal for reaching small crevices and spigots.
- Empty Bucket or Large Bowl: To catch drained water.
- Measuring Cups and Spoons: For accurate dilution of sanitizing solutions.
- Paper Towels: For drying and final touches.
Step-by-Step Guide to Cleaning Your Water Dispenser
Cleaning your water dispenser involves both external scrubbing and internal sanitization. Follow these steps carefully to ensure a thorough job.
1. Unplug and Prepare Your Dispenser
|
Our Picks for the Best Water Dispenser in 2026
As an Amazon Associate I earn from qualifying purchases.
|
||
| Num | Product | Action |
|---|---|---|
| 1 | Brio 130 Series Top-Load Water Cooler Dispenser for 3- and 5-Gallon Bottles, Hot & Cold, Spill-Free Loading, Child Safety Lock, Energy Star 3.0, Black |

|
| 2 | Brio Limited Edition Top Loading Water Cooler Dispenser - Hot & Cold Water, Child Safety Lock, Holds 3 or 5 Gallon Bottles - UL/Energy Star Approved |
|
| 3 | Water Jug Pump for 5 Gallon Bottle – Portable Electric USB-C Charging Dispenser, Dual Powerful Motors, Fast Flow, Fits 2-5 Gallon Jugs – Ideal for Home, Office, Camping, RV, Black |
|
| 4 | Brita UltraMax Large Water Dispenser With Standard Filter, BPA-Free, Reduces Copper, Cadmium and Mercury Impurities, Lasts 2 Months or 40 Gallons, Includes 1 Filter, Kitchen Accessories, Large 27-Cup |
|
| 5 | Brio Self Cleaning Bottom Loading Water Cooler Water Dispenser – Black Stainless Steel - 3 Temperature Settings - Hot, Room & Cold Water |
|
| 6 | Igloo Top Loading Water Cooler – Hot & Cold Dispenser – Black & Stainless Steel, Holds 3 & 5 Gallon Jugs, Child Safety Lock – for Homes, Kitchens, Offices, Dorms |
|
| 7 | Brio 520 UV Self-Cleaning Bottleless Water Cooler Dispenser, UL Certified - Built-in 2 Stage Filtration (2 Free Replacement Filters Included) Reduces PFAS & Microplastics - 3 Temp (Hot Cold, Room) |
|
| 8 | New Wave Enviro Porcelain Water Dispenser, Classic Blue Stripe |
|
| 9 | Brio Self Cleaning Bottom Loading Water Cooler Water Dispenser – Limited Edition - 3 Temperature Settings - Hot, Cold & Cool Water |
|
| 10 | Water Dispenser 5 Gallon Water Bottle Pump |
|
Safety first: Always unplug your water dispenser from the power outlet before starting any cleaning process. This prevents electrical hazards. Remove the empty water bottle and place an empty bucket under the spigots and drain plug to catch any residual water.
2. Drain Remaining Water
Open the hot and cold water spigots to drain all remaining water from the internal tanks. For dispensers with a bottom-loading system, you might need to run the pump to clear the lines. Locate and open the drain plug, usually found at the back or bottom of the unit, to completely empty the reservoir. Once all water is drained, close the spigots and secure the drain plug.
3. Clean the Exterior Surfaces
Using a soft cloth dampened with mild dish soap and warm water, wipe down the entire exterior of the water dispenser. Pay close attention to the top, sides, front panel, and especially the spigots and surrounding areas which are frequently touched. For stubborn spots or mineral deposits, a paste of baking soda and a little water can be effective. Finish by wiping with a clean, damp cloth to remove any soap residue, then dry thoroughly with paper towels.
4. Detail the Drip Tray and Grate
The drip tray is a common collection point for spilled water and often becomes a haven for mold and bacteria. Remove the drip tray and its grate. Wash them thoroughly with hot, soapy water, scrubbing away any residue, slime, or stains with a small brush. Rinse well and let them air dry completely before reattaching them to the dispenser.
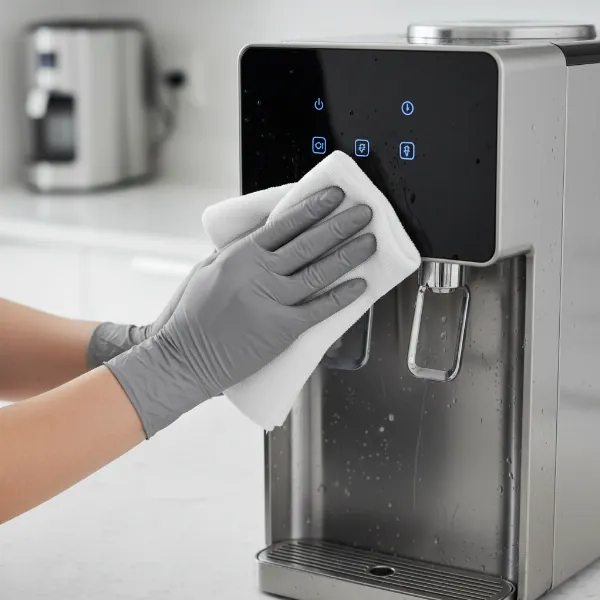 A person cleaning the exterior of a water dispenser with a cloth, showing attention to detail around spigots.
5. Clean the Water Cooler Reservoir
This is the most critical part of the cleaning process. The reservoir is where the water from the bottle collects, making it a prime location for biofilm and mineral deposits.
- For Top-Loading Dispensers: Remove the water guard (the part that pierces the bottle) if it’s detachable. Wash it with hot, soapy water and scrub any grime.
- For All Types: Prepare your sanitizing solution.
Sanitizing Your Water Dispenser
You have two primary options for sanitizing: white vinegar or bleach. Both are effective, but choose the one you’re most comfortable with.
Option A: Sanitizing with White Vinegar (Natural Method)
White vinegar is a natural disinfectant and descaler, effective against mold, bacteria, and mineral buildup.
- Prepare Vinegar Solution: Mix one gallon of hot water with two cups of white vinegar.
- Fill Reservoir: Pour the vinegar solution into the dispenser’s water reservoir. For top-loading units, pour it into the funnel where the bottle usually sits.
- Circulate Solution: Plug the dispenser back in for 5-10 minutes to allow the vinegar solution to heat and circulate through the hot and cold tanks. Then, unplug it again.
- Dispense and Soak: Open both the hot and cold spigots to dispense some of the vinegar solution until you can smell vinegar coming out. This ensures the lines are filled. Close the spigots and let the solution sit in the dispenser for 30 minutes to an hour to thoroughly sanitize and descale.
- Drain and Rinse: Drain the vinegar solution completely through the spigots and the drain plug. Fill the reservoir with clean, fresh water, then drain it completely through the spigots and drain plug. Repeat this rinsing process at least two to three times until there is no residual vinegar smell or taste.
Option B: Sanitizing with Bleach (Stronger Disinfection)
Bleach is a powerful disinfectant, highly effective against bacteria and viruses. Use food-grade bleach for this purpose.
- Prepare Bleach Solution: Mix one teaspoon of unscented, food-grade bleach with one gallon of clean water. Avoid using more bleach than recommended, as it can be difficult to rinse out.
- Fill Reservoir: Pour the bleach solution into the dispenser’s water reservoir.
- Circulate Solution: Plug the dispenser back in for 5-10 minutes to allow the bleach solution to circulate. Then, unplug it.
- Dispense and Soak: Open both the hot and cold spigots to dispense some of the bleach solution until you can smell bleach. Close the spigots and let the solution sit for 5-10 minutes. Do not leave bleach in the dispenser for too long, as it can damage internal components or leave a strong residual odor.
- Drain and Rinse: Drain the bleach solution entirely through the spigots and the drain plug. This step requires thorough rinsing. Fill the reservoir with clean, fresh water, and drain it completely through the spigots and drain plug. Repeat this rinsing process at least three to four times, or more, until you can no longer detect any bleach smell or taste in the dispensed water. It’s crucial to remove all traces of bleach before re-using the dispenser.
“A common mistake is neglecting the rinsing phase after sanitization. Inadequate rinsing can leave behind cleaning agents, affecting water quality and potentially posing health risks.” – Dr. Elena Petrova, Environmental Health Specialist
Reassembly and Final Flush
Once you are confident that all cleaning solutions have been rinsed away, it’s time to put your water dispenser back together.
- Reattach Components: Reinstall the water guard, drip tray, and any other removable parts you detached.
- Place New Water Bottle: Carefully place a fresh, full water bottle onto the dispenser (or load it for bottom-loading models).
- Prime the Dispenser: Plug the dispenser back into the power outlet. Allow the internal tanks to fill completely. For hot/cold models, wait until the water reaches the desired temperatures (the indicator lights will usually signal this).
- Final Flush: Dispense a cup or two of water from both the hot and cold spigots into a separate container and discard. This acts as a final flush, ensuring the first sips you drink are completely free of any lingering cleaning solution taste.
Tips for Maintaining a Clean Water Dispenser Between Deep Cleans
To minimize the effort of deep cleaning and ensure consistently fresh water, adopt these simple maintenance habits:
- Wipe Down Regularly: Quickly wipe the exterior, especially the spigots and drip tray, with a damp cloth every few days.
- Keep Surroundings Clean: Maintain a clean area around the dispenser to prevent dust and grime from accumulating.
- Handle Bottles with Care: When changing water bottles, try to avoid touching the neck of the bottle or the dispenser’s water probe with unwashed hands.
- Use Filtered Water (if applicable): If your dispenser uses a filtration system, ensure filters are changed according to the manufacturer’s recommendations to prevent contaminant buildup.
Conclusion
A clean and sanitized water dispenser is fundamental to enjoying safe, great-tasting water. By following these detailed steps for regular cleaning and choosing between white vinegar or bleach for sanitization, you can effectively prevent the growth of harmful bacteria, mold, and mineral deposits. This routine not only safeguards your health but also extends the lifespan of your appliance, ensuring it continues to provide a convenient source of hydration for years to come. Remember, a little effort in maintenance goes a long way in ensuring the purity of your drinking water. What steps will you take today to ensure your water dispenser is a beacon of clean hydration?
Frequently Asked Questions
Can I use dish soap for internal cleaning and sanitization?
No, dish soap is generally not recommended for the internal reservoir or lines. It can be very difficult to rinse out completely, potentially leaving behind a soapy residue that affects the taste of your water and may not be food-safe if ingested. Stick to white vinegar or food-grade bleach for internal sanitization.
What if my water dispenser has a strong bleach smell after rinsing?
If you still detect a bleach smell, it means you haven’t rinsed thoroughly enough. Continue to fill the reservoir with fresh water and drain it completely through the spigots and drain plug, repeating the process several more times until the smell is completely gone. You can also let it air out for a few hours with the drain plug open.
Is it necessary to clean the hot water tank separately?
No, when you fill the reservoir with the sanitizing solution and allow it to circulate (by plugging it in for a few minutes), the solution will reach both the hot and cold water tanks. Dispensing from both spigots further ensures the lines are cleaned.
Can I use commercial water dispenser cleaning tablets?
Yes, commercial water dispenser cleaning tablets are specifically designed for this purpose and can be a convenient alternative to vinegar or bleach. Always follow the manufacturer’s instructions carefully when using these products to ensure effectiveness and safety.
My dispenser has a filter. Does that mean I don’t need to sanitize it?
While a filter helps remove impurities from the water, it does not prevent the growth of bacteria, mold, or yeast within the dispenser’s reservoir, lines, or spigots. Therefore, even if your dispenser has a filter, regular cleaning and sanitization are still essential for hygiene.