Maintaining a clean water dispenser is crucial for enjoying fresh, great-tasting water every day. Over time, mineral deposits and limescale can build up inside your appliance, affecting its efficiency and the quality of your drinking water. Fortunately, a simple household item – white vinegar – offers an effective and natural solution for descaling. By following a few straightforward steps, you can keep your water dispenser in pristine condition, ensuring it delivers pure refreshment for years to come.
The Importance of Descaling Your Water Dispenser
Your water dispenser works hard, constantly providing you with hydrating sips. However, the water itself can leave behind unwanted guests: hard water deposits and limescale. These mineral buildups are particularly common in areas with hard water, and they can accumulate in the reservoir, lines, and spouts. This accumulation not only impacts the taste and clarity of your water but can also reduce water flow, increase energy consumption, and shorten the lifespan of your appliance. Regular descaling is therefore not just about cleanliness; it’s about safeguarding your health, preserving your dispenser’s functionality, and ensuring every glass of water is as pure as it should be.
What You’ll Need: Essential Tools and Ingredients
Descaling your water dispenser with vinegar requires only a few basic items, most of which you likely already have at home. This makes it an accessible and cost-effective cleaning method.
Here’s your checklist:
- White Vinegar: The star of the show, its acetic acid effectively breaks down mineral deposits.
- Clean Cloths or Soft Sponges: For wiping down surfaces and scrubbing the reservoir.
- Long-Handled Brush (optional): Useful for reaching tricky spots inside the water reservoir.
- Empty Bucket or Large Container: To collect drained water and cleaning solutions.
- Pipe Cleaner or Cotton Swabs (optional): Ideal for cleaning narrow spouts.
- Dish Soap: For general exterior cleaning and pre-cleaning removable parts.
- Safety Gloves (optional but recommended): To protect your hands during the cleaning process.
Step-by-Step Guide: Descaling Your Water Dispenser with Vinegar
Descaling your water dispenser is a simple process that can be broken down into manageable steps. Following this guide will ensure a thorough clean and optimal results.
Step 1: Preparation is Key
|
Our Picks for the Best Water Dispenser in 2026
As an Amazon Associate I earn from qualifying purchases.
|
||
| Num | Product | Action |
|---|---|---|
| 1 | Water Dispenser 5 Gallon Water Bottle Pump |

|
| 2 | Water Jug Pump for 5 Gallon Bottle – Portable Electric USB-C Charging Dispenser, Dual Powerful Motors, Fast Flow, Fits 2-5 Gallon Jugs – Ideal for Home, Office, Camping, RV, Black |
|
| 3 | Brio 130 Series Top-Load Water Cooler Dispenser for 3- and 5-Gallon Bottles, Hot & Cold, Spill-Free Loading, Child Safety Lock, Energy Star 3.0, Black |
|
| 4 | New Wave Enviro Porcelain Water Dispenser, Classic Blue Stripe |
|
| 5 | Brio Self Cleaning Bottom Loading Water Cooler Water Dispenser – Limited Edition - 3 Temperature Settings - Hot, Cold & Cool Water |
|
| 6 | Brio 520 UV Self-Cleaning Bottleless Water Cooler Dispenser, UL Certified - Built-in 2 Stage Filtration (2 Free Replacement Filters Included) Reduces PFAS & Microplastics - 3 Temp (Hot Cold, Room) |
|
| 7 | Brio Limited Edition Top Loading Water Cooler Dispenser - Hot & Cold Water, Child Safety Lock, Holds 3 or 5 Gallon Bottles - UL/Energy Star Approved |
|
| 8 | Brio Self Cleaning Bottom Loading Water Cooler Water Dispenser – Black Stainless Steel - 3 Temperature Settings - Hot, Room & Cold Water |
|
| 9 | Brita UltraMax Large Water Dispenser With Standard Filter, BPA-Free, Reduces Copper, Cadmium and Mercury Impurities, Lasts 2 Months or 40 Gallons, Includes 1 Filter, Kitchen Accessories, Large 27-Cup |
|
| 10 | Igloo Top Loading Water Cooler – Hot & Cold Dispenser – Black & Stainless Steel, Holds 3 & 5 Gallon Jugs, Child Safety Lock – for Homes, Kitchens, Offices, Dorms |
|
Before you begin any cleaning, safety and preparation are paramount. Start by ensuring your dispenser is completely ready for the descaling process.
First, unplug your water dispenser from the power outlet to prevent any electrical hazards. Next, if you have a top-loading dispenser, carefully remove the water bottle. For bottom-loading or plumbed-in models, ensure the water supply is turned off. Then, drain any remaining water from both the hot and cold water tanks by dispensing through the spouts into your empty bucket until nothing more comes out. Remove and wash any removable components such as the drip tray and its cover with warm soapy water, setting them aside to dry.
Step 2: Descaling the Internal Reservoir and Components
This is where the magic of vinegar truly shines, working to dissolve those stubborn mineral deposits that hide within your dispenser’s internal workings. The method might vary slightly depending on your dispenser type.
For reservoir-based dispensers (common for bottled water units), create a descaling solution by mixing equal parts white vinegar and water. For example, if your reservoir holds a gallon, use half a gallon of vinegar and half a gallon of water. Pour this solution directly into the water reservoir. Allow the solution to sit for at least 10 to 30 minutes, or even up to an hour for heavy limescale buildup. During this “dwell time,” the vinegar’s acidity will break down the mineral deposits. If your reservoir is accessible, use a long-handled brush or a clean, soft sponge to gently scrub the interior walls, dislodging any loosened deposits. For refrigerator water line dispensers, the approach is slightly different. You might need to access the water line behind your fridge. Fill a clean cup with pure white vinegar, then insert the water line tube into the cup. Activate the dispenser until you can smell vinegar coming through the spouts, indicating the solution has filled the line. Let it sit for approximately 5 minutes before proceeding to rinse.
Step 3: Tackling Spouts, Trays, and Exterior
While the vinegar works its wonders internally, you can turn your attention to the exterior and other visible components that often accumulate grime and hard water stains.
For the water spouts, which are prime spots for buildup, dip a pipe cleaner or cotton swab in undiluted white vinegar and thoroughly clean inside and around the dispensing nozzles. For areas with visible hard water stains on the dispenser panel or drip tray housing, soak clean towels or paper towels in white vinegar and lay them over the affected areas. Let these vinegar-soaked towels sit for about 15-20 minutes, allowing the acid to break down the deposits. After the soaking, wipe down the entire exterior of your water dispenser with a clean cloth dampened with a mild vinegar and water solution (e.g., 1 part vinegar to 3 parts water), paying attention to buttons and crevices.
> “Regular descaling with natural agents like vinegar is not just about aesthetics; it’s a critical step in ensuring the safety and longevity of your water dispenser.” – Admin, WaterDispenserPro.com
Step 4: Thorough Rinsing
After allowing the vinegar to work its descaling power, a thorough rinsing process is absolutely essential. This step removes all traces of the vinegar solution and any loosened mineral particles, preventing any lingering taste or odor.
First, completely drain the vinegar solution from the internal reservoir and dispense any remaining solution through the spouts into your bucket. Once the dispenser is empty, fill the reservoir with clean, fresh water. Dispense several cups of this clean water through both the hot and cold spouts, flushing the system thoroughly. Repeat this filling and flushing process multiple times, typically three to five times, until you can no longer detect any vinegar smell or taste in the dispensed water. For external surfaces, remove any vinegar-soaked towels and wipe down all cleaned areas with a clean, damp cloth, followed by a dry cloth to prevent water spots. This diligent rinsing ensures your water tastes perfectly clean and free from any residual vinegar.
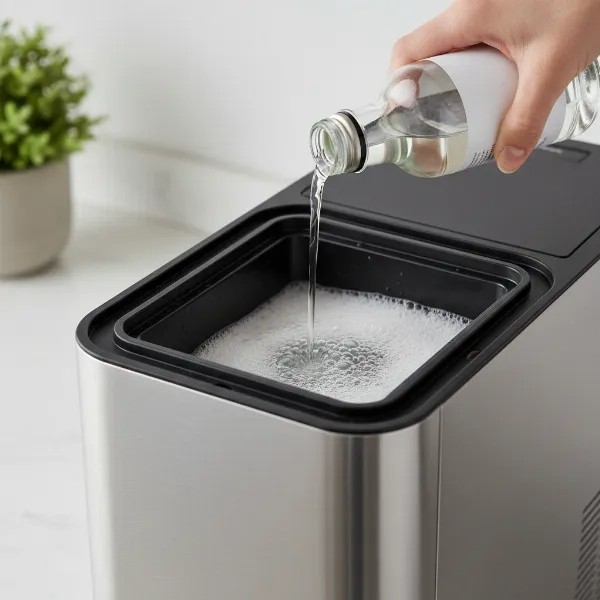 A hand pouring white vinegar into a water dispenser reservoir, illustrating the descaling process.
Step 5: Reassembly and Final Checks
You’re almost there! Once the internal and external components are clean and thoroughly rinsed, it’s time to put your water dispenser back together and confirm it’s ready for use.
Carefully reassemble all the removable parts you took off earlier, ensuring they are securely in place. If you have a bottled water dispenser, place a new, full water bottle back onto the unit. For plumbed-in dispensers, turn your water supply back on. Now, plug the dispenser back into the power outlet. Allow the tanks to refill and the water to reach your desired temperatures (if it’s a hot and cold model). As a final check, dispense a few more cups of clean water, tasting it to confirm no vinegar residue remains. This is also an excellent opportunity to change your water filter if your model has one, ensuring that your newly descaled system provides the cleanest, freshest water possible.
How Often Should You Descale Your Water Dispenser?
The frequency of descaling largely depends on your water hardness and how often you use your dispenser. Harder water contains more minerals, leading to quicker buildup.
As a general guideline, it is recommended to descale your water dispenser every three to six months. However, if you notice a significant decrease in water flow, a strange taste, or visible mineral deposits around the spouts before this timeframe, it’s a clear sign that your dispenser needs attention sooner. Regular, proactive descaling will prevent severe buildup and keep your water dispenser operating efficiently.
Common Mistakes to Avoid When Descaling
While descaling with vinegar is generally safe and straightforward, avoiding a few common pitfalls can ensure a successful and damage-free cleaning experience.
Firstly, never forget to unplug your dispenser before you start cleaning; this is a critical safety step to prevent electric shock. Secondly, insufficient rinsing is a frequent mistake that can leave an unpleasant vinegar taste in your water. Always flush the system multiple times with fresh water until the smell completely dissipates. Thirdly, avoid using abrasive cleaners or harsh chemicals (like bleach alongside vinegar, which can create dangerous fumes) inside your water dispenser, as these can damage internal components or leave harmful residues. Lastly, always consult your dispenser’s owner’s manual before cleaning. Some manufacturers might have specific instructions or warnings regarding cleaning agents or methods, especially for specialized filtering systems.
The Benefits of Regular Descaling
Embracing a routine of regular descaling for your water dispenser with vinegar offers a multitude of advantages that go beyond just a clean appearance. It’s an investment in your health and the longevity of your appliance.
The most immediate benefit is improved water taste and purity. By eliminating mineral buildup, you remove potential sources of off-flavors, ensuring your water is crisp and refreshing. Regular cleaning also significantly extends the lifespan of your appliance, as scale accumulation can strain heating and cooling elements, leading to premature wear and tear. You’ll also notice better water flow from the spouts, as blockages are cleared away. Furthermore, while vinegar is primarily a descaler, its acidic properties also help in inhibiting bacterial growth, contributing to a more hygienic water source. A well-maintained dispenser operates more efficiently, potentially leading to lower energy consumption.
Conclusion
Descaling your water dispenser with vinegar is a simple, effective, and natural way to ensure it continuously provides clean, great-tasting water. By following the easy steps of preparation, descaling, thorough rinsing, and reassembly, you can eliminate stubborn mineral buildup and significantly enhance your dispenser’s performance and lifespan. Regular maintenance not only guarantees a healthier hydration source but also contributes to the overall efficiency and durability of your appliance. Make descaling a routine part of your home care, and you’ll always enjoy the purest water.
What steps will you take today to ensure your water dispenser is delivering its best?
Frequently Asked Questions
Is white vinegar safe to use for descaling all types of water dispensers?
Yes, white vinegar is generally safe for most water dispensers, as it’s a mild, natural acid that effectively breaks down mineral deposits without harsh chemicals. However, it’s always recommended to check your appliance’s user manual for any specific cleaning instructions or warnings from the manufacturer to ensure compatibility.
How long does the vinegar smell last after descaling?
The vinegar smell should dissipate after thorough rinsing. If you still detect a lingering odor, it means more rinsing is needed. Continue flushing the system with fresh water and dispensing it through the spouts until the smell is completely gone, which may require several cycles.
Can I use apple cider vinegar instead of white vinegar for descaling?
While apple cider vinegar also contains acetic acid, white vinegar is preferred for descaling. White vinegar has a higher acetic acid concentration (typically 5-8%) and lacks the sugars and other compounds found in apple cider vinegar, which could leave residues or different odors.
What are the signs that my water dispenser needs descaling?
Key indicators that your water dispenser needs descaling include reduced water flow from the spouts, visible white, chalky buildup around the nozzles or inside the reservoir, strange tastes or odors in the water, or increased noise from the dispenser’s internal components. Addressing these signs promptly will prevent further issues.
How does vinegar actually remove limescale?
Vinegar removes limescale (calcium carbonate) through a chemical reaction. The acetic acid in vinegar reacts with the calcium carbonate, breaking it down into carbon dioxide gas and water-soluble calcium acetate. This process effectively dissolves the hard, crusty deposits, allowing them to be rinsed away.