Tired of lifting heavy water bottles or running out of clean drinking water? A bottleless water dispenser offers an endless supply of purified water directly from your tap, eliminating the hassle and environmental impact of traditional bottled coolers. Installing a water line for these modern conveniences might seem daunting, but with the right guidance, it’s a straightforward DIY project for most homeowners. This comprehensive guide will walk you through every step, ensuring you enjoy fresh, filtered water in no time.
Why Choose a Bottleless Water Dispenser?
Bottleless water dispensers, also known as plumbed-in or direct connect systems, offer significant advantages over their bottled counterparts. They connect directly to your home’s water supply, providing on-demand filtered water without the need for constant bottle replacements. This not only saves you money on recurring bottle purchases and delivery fees but also drastically reduces plastic waste, contributing to a greener planet. With built-in filtration, you get consistently clean and great-tasting water, often with options for hot and cold temperatures, ready whenever you need it.
Essential Preparation Before You Begin
Proper preparation is crucial for a smooth installation. Gathering the necessary tools and materials beforehand and selecting the ideal location will prevent interruptions and ensure a safe setup. Taking the time to prepare thoroughly will simplify the entire process and help you achieve professional-looking results.
Gathering Your Tools and Materials
Before starting, ensure you have all the necessary items on hand. Most bottleless dispensers come with an installation kit, but you might need additional common tools. This list covers the essentials for a typical setup.
- Bottleless Water Dispenser: With its included installation kit (typically contains PE tubing, T-valve, and quick-connect fittings).
- Adjustable Wrench or Pliers: For tightening connections.
- Utility Knife or Tubing Cutter: To cut the plastic (PE) water line tubing cleanly.
- Bucket and Towels: To catch any drips and clean up spills.
- Teflon Tape (Thread Seal Tape): To ensure watertight seals on threaded connections.
- Drill (Optional): If you need to create a new hole for the water line (e.g., through a cabinet).
- Shut-off Valve: An inline shut-off valve is often included in kits but might need to be purchased separately if your existing cold water line doesn’t have one readily accessible or if you want an extra layer of control.
|
Our Picks for the Best Water Dispenser in 2026
As an Amazon Associate I earn from qualifying purchases.
|
||
| Num | Product | Action |
|---|---|---|
| 1 | Igloo Top Loading Water Cooler – Hot & Cold Dispenser – Black & Stainless Steel, Holds 3 & 5 Gallon Jugs, Child Safety Lock – for Homes, Kitchens, Offices, Dorms |

|
| 2 | Brio Limited Edition Top Loading Water Cooler Dispenser - Hot & Cold Water, Child Safety Lock, Holds 3 or 5 Gallon Bottles - UL/Energy Star Approved |
|
| 3 | Brio 520 UV Self-Cleaning Bottleless Water Cooler Dispenser, UL Certified - Built-in 2 Stage Filtration (2 Free Replacement Filters Included) Reduces PFAS & Microplastics - 3 Temp (Hot Cold, Room) |
|
| 4 | Brio 130 Series Top-Load Water Cooler Dispenser for 3- and 5-Gallon Bottles, Hot & Cold, Spill-Free Loading, Child Safety Lock, Energy Star 3.0, Black |
|
| 5 | Water Jug Pump for 5 Gallon Bottle – Portable Electric USB-C Charging Dispenser, Dual Powerful Motors, Fast Flow, Fits 2-5 Gallon Jugs – Ideal for Home, Office, Camping, RV, Black |
|
| 6 | Brio Self Cleaning Bottom Loading Water Cooler Water Dispenser – Black Stainless Steel - 3 Temperature Settings - Hot, Room & Cold Water |
|
| 7 | Brita UltraMax Large Water Dispenser With Standard Filter, BPA-Free, Reduces Copper, Cadmium and Mercury Impurities, Lasts 2 Months or 40 Gallons, Includes 1 Filter, Kitchen Accessories, Large 27-Cup |
|
| 8 | New Wave Enviro Porcelain Water Dispenser, Classic Blue Stripe |
|
| 9 | Water Dispenser 5 Gallon Water Bottle Pump |
|
| 10 | Brio Self Cleaning Bottom Loading Water Cooler Water Dispenser – Limited Edition - 3 Temperature Settings - Hot, Cold & Cool Water |
|
Choosing the Ideal Location
Selecting the right spot for your dispenser is vital for both convenience and installation ease. The best locations are typically in kitchens or utility rooms, where water access and power outlets are readily available.
Look for a flat, sturdy surface that can support the weight of the dispenser, especially when it’s filled with water. The location should be near a cold water supply line (such as under a sink or behind a refrigerator) and a standard electrical outlet. Ensure there’s enough clearance around the unit for proper ventilation and for accessing filters for future maintenance.
Safety First: Prioritizing Your Well-being
Working with water lines and electricity requires adherence to safety protocols. Always prioritize your safety to prevent accidents and damage.
The most critical first step is to turn off the main water supply to your home, or at least the specific cold water line you’ll be tapping into. Additionally, ensure the water dispenser itself is unplugged from the electrical outlet until all water connections are secure and leak-free.
Step-by-Step Water Line Installation Guide
Installing a water line for your bottleless dispenser can be broken down into manageable steps. Follow these instructions carefully to ensure a secure and functional setup. Whether you’re connecting to a refrigerator line or an under-sink cold water pipe, the principles remain similar.
Step 1: Turn Off the Water Supply
Before making any connections, locate and turn off the cold water supply. This is usually accomplished by turning a handle on an existing shut-off valve under your sink or behind your refrigerator. If no individual valve is present, you may need to turn off the main water supply to your entire home. Open a nearby faucet to relieve any residual pressure in the pipes after shutting off the water.
Step 2: Locate Your Cold Water Line
The most common connection points for a bottleless water dispenser are the cold water line under your kitchen sink or the existing water line for your refrigerator’s ice maker and water dispenser.
If connecting under the sink, identify the cold water pipe leading to your faucet. For a refrigerator connection, gently pull the refrigerator away from the wall to access the water line behind it. Ensure you are tapping into a cold water line, as hot water can damage the dispenser’s internal components and filters.
Step 3: Prepare the Connection Point
This step varies slightly depending on your chosen water source. If connecting to a refrigerator water line, you will typically cut the existing plastic (PE) tubing cleanly. For under-sink connections, you might need to disconnect the cold water supply hose from the faucet’s existing shut-off valve.
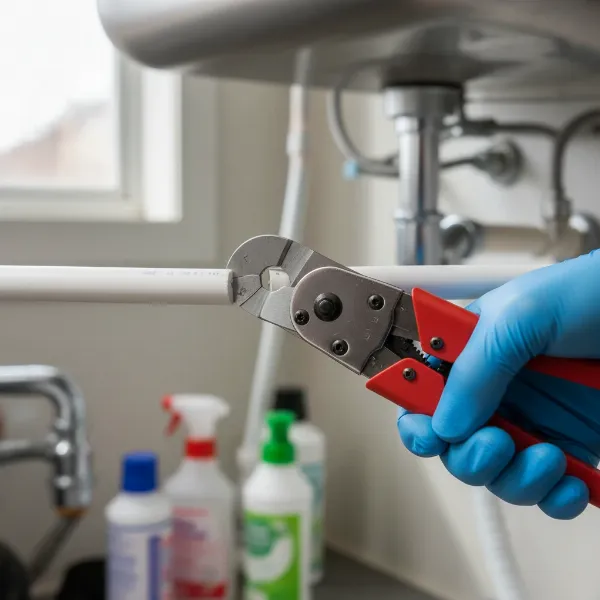 A close-up image showing a plastic water line being cut for a refrigerator connection.
> “Always make clean, straight cuts on your tubing. Ragged edges can lead to leaks, no matter how well you tighten the fittings.” – David Chen, Master Plumber
Step 4: Install the T-Connector or Adapter
A T-connector or saddle valve is used to create a branch off your existing cold water line to supply the dispenser.
For refrigerator lines, a 3-way plastic adapter (often included in dispenser kits) is typically inserted between the cut ends of the existing PE tubing. For under-sink connections, a T-valve or compression T-fitting is usually installed at the existing cold water shut-off valve, allowing both the faucet and the dispenser to draw water. Apply Teflon tape to any threaded connections to ensure a watertight seal before tightening with a wrench.
Step 5: Connect the Dispenser Water Line
Now, connect one end of the new PE tubing supplied with your bottleless water dispenser to the open port on the T-connector or adapter you just installed. Most modern kits use quick-connect fittings: simply push the tubing firmly into the fitting until it seats securely.
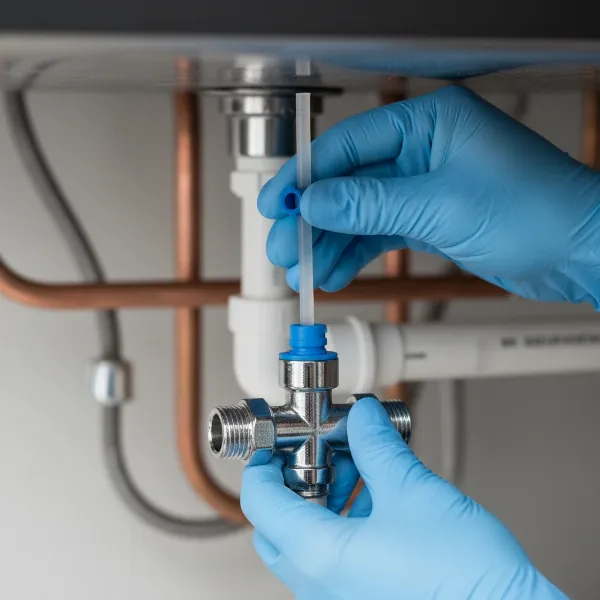 A person connecting a plastic water line tube into a quick-connect fitting on a T-valve.
Route the tubing carefully from the connection point to the back of your water dispenser, avoiding kinks or sharp bends. Leave a bit of slack in the line to allow for minor adjustments.
Step 6: Secure All Connections and Check for Leaks
Once all the tubing is connected, double-check that every fitting is snug. For threaded connections, ensure they are tight but avoid over-tightening, which can strip threads or crack plastic components.
Slowly turn the main water supply or the cold water valve back on. Carefully inspect all new connections for any signs of leakage. Even a small drip can become a major problem over time. If you notice any leaks, turn off the water, tighten the problematic connection, and re-check. A few drops initially might just be residual water, but persistent dripping needs attention.
Step 7: Flush the Dispenser and Filters
Before drinking any water, it’s crucial to flush the new dispenser and its filtration system. This removes any air from the lines, carbon dust from new filters, and manufacturing residues.
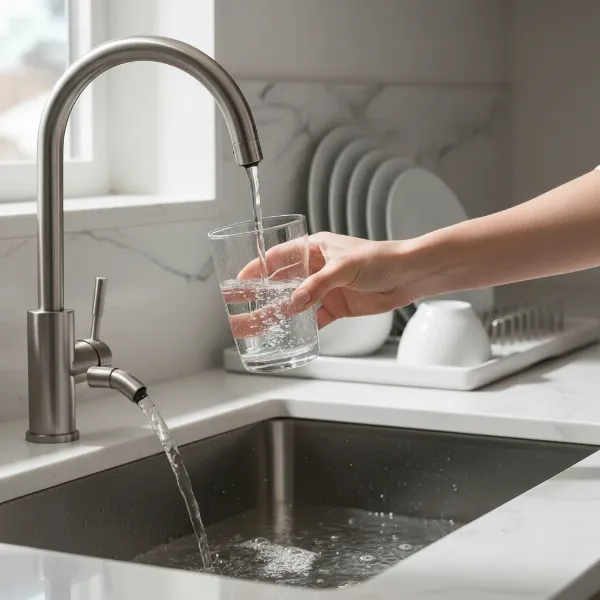 A hand holding a glass under a bottleless water dispenser faucet, flushing water into a sink.
Refer to your dispenser’s manual for specific flushing instructions, but generally, you will run several gallons of water through both the hot and cold spouts until the water runs clear and tastes normal. Some units may require flushing for 2-5 minutes or more.
Step 8: Plug In and Enjoy
After successfully flushing the system and confirming no leaks, you can finally plug your bottleless water dispenser into a grounded electrical outlet. Allow some time for the hot and cold tanks to fill and reach their target temperatures. This might take 30 minutes to an hour. Once ready, you’ll have instant access to refreshing, filtered water without the hassle of bottles.
Common Challenges and Troubleshooting
Even with careful installation, you might encounter minor issues. Knowing how to troubleshoot them can save you time and frustration. Addressing these problems promptly ensures your dispenser operates efficiently.
- Leaky Connections: The most common issue. Ensure all threaded connections have Teflon tape applied and are tightened correctly. For quick-connect fittings, confirm the tubing is fully inserted and the locking mechanism (if any) is engaged. Turn off the water, re-secure, and test again.
- No Water Flow: Check that the main water supply and any inline shut-off valves are fully open. Ensure the tubing isn’t kinked. Also, verify that the filters are correctly installed and that the dispenser has had enough time to fill its internal tanks after the initial flush. Air pockets can sometimes temporarily prevent flow; continued flushing usually resolves this.
- Metallic Water Lines: If your existing water lines are rigid copper or galvanized steel, installing a plastic T-connector can be more challenging and may require specific compression fittings or even professional plumbing assistance. It’s often safer to involve a plumber in such cases to ensure proper seals and avoid damaging your existing plumbing.
Maintenance Tips After Installation
Proper maintenance will extend the life of your bottleless water dispenser and ensure you always have access to clean, fresh water. Regular care is simple and primarily involves cleaning and filter replacement.
- Regular Cleaning: Periodically clean the dispenser’s exterior with a soft cloth and mild detergent. The drip tray should be emptied and washed regularly to prevent mold and mildew growth. For internal cleaning, consult your dispenser’s manual, as some units have self-cleaning cycles or require specific descaling procedures.
- Filter Replacement: The built-in filters are crucial for water quality. Their lifespan depends on your water quality and usage, but typically filters need to be replaced every 6 to 12 months. Refer to your dispenser’s manual for the recommended replacement schedule and type of filter. Failing to replace filters can lead to reduced water quality and flow issues.
Conclusion
Installing a water line for a bottleless water dispenser is a rewarding project that transforms your hydration experience. By carefully following these steps, from gathering your tools to making secure connections and performing the initial flush, you can confidently set up your new system. Enjoy the continuous supply of clean, filtered water, knowing you’ve made a smart choice for convenience, health, and the environment. What other smart home upgrades are you considering to enhance your daily life?
Frequently Asked Questions
Do I need a plumber to install a bottleless water dispenser?
While calling a professional is always an option, many bottleless water dispensers are designed for DIY installation. If you are comfortable with basic plumbing tasks like turning off water, cutting plastic tubing, and tightening fittings, you can likely install it yourself. However, if you have old or complex plumbing (e.g., rigid metal lines) or are unsure, a plumber can ensure a leak-free and compliant setup.
What kind of water line do I need for a bottleless dispenser?
Bottleless water dispensers typically connect to a standard cold water supply line using small-diameter plastic (PE) tubing, often 1/4-inch or 3/8-inch. The installation kit usually includes this tubing and the necessary fittings, such as a T-valve or saddle valve, to tap into an existing cold water pipe under your sink or behind your refrigerator.
How often should I flush my bottleless water dispenser?
You should always perform an initial flush when first installing your bottleless water dispenser and after every filter replacement. This process removes air from the lines and any carbon dust from new filters, ensuring optimal water taste and quality. For ongoing maintenance, periodic flushing as part of a deeper cleaning can be beneficial, but filter changes are the primary scheduled event.
Can I connect a bottleless dispenser to a hot water line?
No, you should only connect a bottleless water dispenser to a cold water line. Hot water can severely damage the internal filtration components and other sensitive parts of the dispenser. Always ensure you have identified and tapped into the cold water supply to prevent costly damage and ensure proper operation.