A dripping water dispenser spigot is more than just an annoyance; it signals a potential problem that could lead to water waste, messy puddles, and even hygiene concerns. As an admin at WaterDispenserPro.com and a technician with over a decade of experience, I’ve seen countless spigots fail, and I can tell you that replacing one is a straightforward task you can handle yourself. This guide will walk you through every step, ensuring your water dispenser returns to optimal, leak-free operation.
Why a Faulty Water Dispenser Spigot Needs Immediate Attention
A malfunctioning water dispenser spigot isn’t merely an inconvenience; it can have several adverse impacts on your home and health. Persistent leaks can lead to costly water damage to floors or cabinetry, creating a breeding ground for mold and mildew. Beyond the structural implications, a compromised spigot can introduce contaminants to your drinking water, undermining the very purpose of having a clean water source. Moreover, a leaky spigot often means your dispenser works less efficiently, potentially affecting water temperature and overall performance. Addressing these issues promptly is crucial for maintaining a healthy and functional hydration station.
Identifying the Right Replacement Spigot for Your Water Dispenser
Choosing the correct replacement spigot is the first vital step to a successful repair. Spigots come in various designs, including push-lever, paddle, and spring-loaded types, each offering a different user experience. Crucially, you must match the new spigot’s size and thread type to your existing dispenser’s opening to ensure a secure and watertight fit. Materials also vary, with plastic being common for affordability and metal offering enhanced durability. Always check your dispenser’s manual or the manufacturer’s website for specific part numbers. When in doubt, take a photo of your current spigot and its mounting area, or even remove the old one to compare it directly when purchasing a replacement from trusted retailers or the original manufacturer. This attention to detail prevents compatibility issues and guarantees a proper seal.
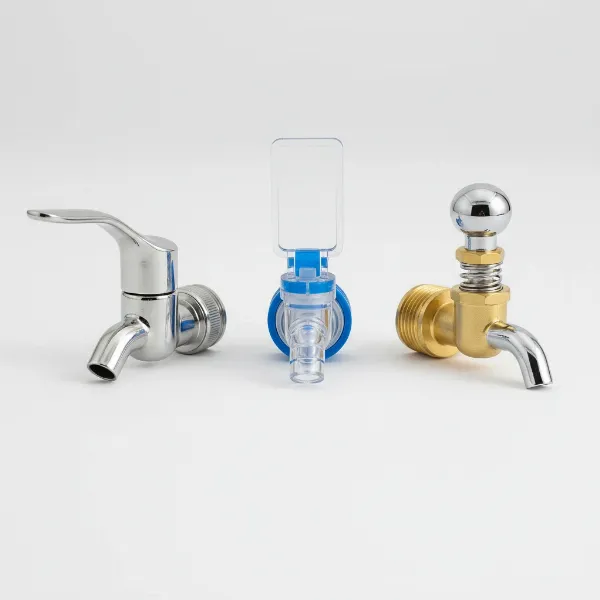 Various types of water dispenser spigots, including push-lever, paddle, and spring-loaded designs.
Essential Tools and Materials for Spigot Replacement
Having the right tools at hand makes the spigot replacement process smooth and efficient. Most replacements require only basic household items, ensuring you can tackle the job without a trip to a specialized hardware store. The table below outlines the necessary tools and materials, along with their purpose in the replacement process.
| Tool/Material | Description | Purpose |
|---|---|---|
| Adjustable Wrench/Pliers | To loosen and tighten nuts | Securing the new spigot |
| Small Bucket/Towel | To catch residual water and clean up spills | Minimize mess during replacement |
| Screwdriver (optional) | For models with screw-attached covers | Accessing the spigot assembly |
| Cleaning Cloth/Brush | For cleaning around the spigot area | Ensuring a clean seal and preventing mold |
| Thread Seal Tape (Teflon) | To prevent leaks on threaded connections | Creating a watertight seal |
| Replacement Spigot | The new part matching your dispenser | The core component to be installed |
Step-by-Step Guide: How to Replace Your Water Dispenser Spigot
Replacing a water dispenser spigot is a task that even a novice can accomplish with confidence, provided you follow these methodical steps.
Step 1: Preparation & Safety First
|
Our Picks for the Best Water Dispenser in 2026
As an Amazon Associate I earn from qualifying purchases.
|
||
| Num | Product | Action |
|---|---|---|
| 1 | Brio Self Cleaning Bottom Loading Water Cooler Water Dispenser – Black Stainless Steel - 3 Temperature Settings - Hot, Room & Cold Water |

|
| 2 | Brio Self Cleaning Bottom Loading Water Cooler Water Dispenser – Limited Edition - 3 Temperature Settings - Hot, Cold & Cool Water |
|
| 3 | Water Dispenser 5 Gallon Water Bottle Pump |
|
| 4 | Brio 520 UV Self-Cleaning Bottleless Water Cooler Dispenser, UL Certified - Built-in 2 Stage Filtration (2 Free Replacement Filters Included) Reduces PFAS & Microplastics - 3 Temp (Hot Cold, Room) |
|
| 5 | Igloo Top Loading Water Cooler – Hot & Cold Dispenser – Black & Stainless Steel, Holds 3 & 5 Gallon Jugs, Child Safety Lock – for Homes, Kitchens, Offices, Dorms |
|
| 6 | New Wave Enviro Porcelain Water Dispenser, Classic Blue Stripe |
|
| 7 | Brita UltraMax Large Water Dispenser With Standard Filter, BPA-Free, Reduces Copper, Cadmium and Mercury Impurities, Lasts 2 Months or 40 Gallons, Includes 1 Filter, Kitchen Accessories, Large 27-Cup |
|
| 8 | Water Jug Pump for 5 Gallon Bottle – Portable Electric USB-C Charging Dispenser, Dual Powerful Motors, Fast Flow, Fits 2-5 Gallon Jugs – Ideal for Home, Office, Camping, RV, Black |
|
| 9 | Brio Limited Edition Top Loading Water Cooler Dispenser - Hot & Cold Water, Child Safety Lock, Holds 3 or 5 Gallon Bottles - UL/Energy Star Approved |
|
| 10 | Brio 130 Series Top-Load Water Cooler Dispenser for 3- and 5-Gallon Bottles, Hot & Cold, Spill-Free Loading, Child Safety Lock, Energy Star 3.0, Black |
|
Before you begin any work, prioritize safety and preparation. Unplug your water dispenser from the power outlet to eliminate any electrical hazards, especially if it’s a hot and cold unit. If your dispenser has a hot water tank, switch off the hot tank heater on the back of the unit and allow it to cool for at least an hour to prevent burns. Next, remove the water bottle from the top or bottom of the dispenser. Finally, drain any remaining water from both the hot and cold spigots into a bucket until the reservoir is completely empty. This ensures there’s no water pressure or spills during the replacement.
Step 2: Remove the Old Spigot
With the dispenser prepared, you can now carefully remove the faulty spigot. Depending on your water dispenser model, this usually involves unscrewing a coupling nut either on the outside or inside the dispenser’s body. For some models, you might need a wrench to loosen a tight nut. Other designs may feature retaining tabs that need to be depressed with a flathead screwdriver or simply twist off counter-clockwise. Be gentle to avoid damaging the dispenser body itself. Keep a towel handy to catch any last drips of water as the spigot is removed.
Step 3: Clean the Spigot Opening
Once the old spigot is out, thoroughly clean the area around the spigot opening. Use a clean cloth or a small brush with a mild cleaning solution (like diluted vinegar or dish soap) to remove any mineral buildup, residue, or mold that may have accumulated. This step is critical for ensuring a clean surface for the new spigot to seal against, preventing future leaks and maintaining hygiene. Inspect the opening for any cracks or damage that might affect the new spigot’s fit.
Step 4: Install the New Spigot
Now it’s time to install your new spigot. Carefully insert the new spigot into the opening, ensuring it’s properly aligned. If your replacement spigot uses internal and external nuts, secure the internal nut first, then the external one, tightening them evenly by hand. For threaded spigots, apply a few wraps of thread seal tape (Teflon tape) clockwise around the threads before screwing it into place. This tape helps create a watertight seal and prevents leaks. Use an adjustable wrench or pliers to gently tighten the nuts or screw the spigot until it is snug and secure, but avoid overtightening, which can crack plastic components.
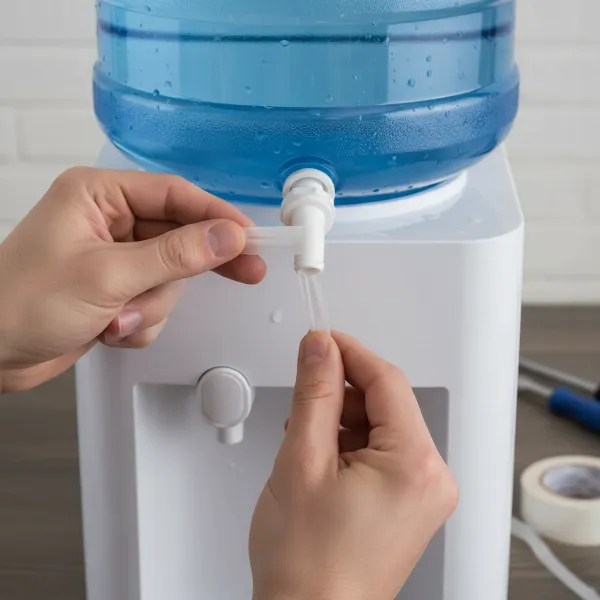 Hands installing a new water dispenser spigot, showing thread seal tape application.
Step 5: Test and Prime the System
With the new spigot firmly in place, it’s time to test your work. Place a fresh water bottle back onto the dispenser. Allow a few minutes for the reservoir to fill. Before plugging in a hot and cold unit, dispense several cups of water from both the hot and cold spigots to flush out any air and prime the system. Carefully check for any drips or leaks around the newly installed spigot. If no leaks are detected, you can plug in the dispenser and turn on the hot tank switch if applicable. Your water dispenser is now ready for use!
Common Challenges and Troubleshooting During Spigot Replacement
Even with a detailed guide, you might encounter a few hiccups during the replacement process. Knowing how to address them can save you time and frustration.
Spigot Too Tight to Remove
Sometimes, the old spigot’s nuts or threads can seize up due to mineral deposits or corrosion. If an adjustable wrench isn’t enough, try applying a small amount of penetrating oil to the threads and let it sit for a few minutes. For plastic parts, a gentle application of heat from a hairdryer (on a low setting and from a distance) might help, but exercise extreme caution to avoid melting.
Leaking After Replacement
If your new spigot still leaks, don’t despair. First, ensure all nuts and couplings are adequately tightened – sometimes a quarter-turn more is all that’s needed. Double-check that the gaskets or washers are correctly seated and not pinched or missing. If you used thread seal tape, verify it was applied smoothly and completely. A persistent leak might indicate a faulty new spigot, an underlying issue with the dispenser’s internal water line, or an improperly seated water bottle.
Incorrect Spigot Size
A common oversight is purchasing the wrong size or thread type. If the new spigot doesn’t fit snugly or if the threads don’t engage easily, it’s likely incompatible. Do not force it, as this can damage the dispenser. Re-verify your dispenser’s model and the specific spigot requirements before attempting to install.
Damaged Dispenser Body
If, during removal or installation, you notice cracks or damage to the dispenser’s body around the spigot opening, this could be a more serious issue. Small cracks might be sealed with food-grade silicone sealant, but larger damage often requires professional repair or even a dispenser replacement to ensure water safety and prevent extensive leaks.
“Always remember, the success of a spigot replacement hinges on precision. A small oversight in alignment or tightening can lead to a persistent drip. Don’t rush, and always test thoroughly.” – John Smith, Senior Water Dispenser Technician
Maintaining Your Water Dispenser Spigot for Longevity
Replacing your water dispenser spigot is a great step towards maintaining your unit, and incorporating regular maintenance will prolong its life and ensure clean drinking water. Routine cleaning is paramount; periodically use warm water with a small amount of dish soap or a mild vinegar solution to clean the spout and the surrounding area. For disinfection, a diluted bleach solution (one teaspoon of bleach per gallon of water) can be sprayed lightly on the spigots, wiped, and then thoroughly rinsed with clean water to prevent taste contamination.
Avoid using harsh abrasive cleaners or strong chemical solvents, especially on chrome-covered plastic spigots, as these can damage the finish and material. If your dispenser has a hot water tank, consider draining it every few years, particularly in areas with hard water, to remove mineral and sediment buildup that can reduce efficiency. When not in use for extended periods, it’s beneficial to leave the spigot open to air dry completely, preventing mold and bacterial growth. These simple practices will keep your water flowing freely and cleanly for years to come.
Conclusion
Replacing a faulty water dispenser spigot is a manageable home repair that empowers you to maintain your hydration station efficiently and hygienically. By carefully following the steps outlined in this guide – from identifying the correct replacement part to meticulous installation and testing – you can confidently restore your water dispenser to optimal, leak-free performance. Regular maintenance of your spigots further ensures longevity and continuous access to fresh, clean water. Taking these proactive steps saves money on professional repairs and contributes to a healthier living environment.
What other small yet impactful home appliance repairs have you successfully tackled yourself, making a difference in your daily routine?
Frequently Asked Questions
How often should I check my spigot for issues?
It’s advisable to visually inspect your water dispenser spigots monthly for any signs of wear, drips, or unusual accumulation around the nozzle. More thorough checks, including testing for leaks, should be done every three to six months, or immediately if you notice changes in water flow or taste.
Can I use universal spigots for any water dispenser?
While some spigots are marketed as “universal,” it’s crucial to verify compatibility with your specific water dispenser model. Dispenser spigots vary significantly in thread size, mounting mechanism, and internal design. Using an incompatible spigot can lead to leaks and potential damage.
What’s the best way to clean a spigot?
For daily cleaning, a cloth with warm water and dish soap works well. For deeper sanitation, a solution of one teaspoon of bleach per gallon of water, or diluted white vinegar, can be used. Apply, let sit briefly, then wipe thoroughly and flush with clean water to remove any residue.
My hot water spigot is leaking, is it different to fix?
The replacement process for a hot water spigot is generally the same as for a cold one, but with an added crucial safety step: always turn off the hot tank heater and allow the water to cool completely before attempting any repairs. This prevents severe burns.
What if the leak isn’t from the spigot but still from the dispenser?
If you’ve confirmed the spigot is not the source of the leak, inspect other components such as the water bottle itself (for cracks), the water lines inside the dispenser, the reservoir, or the water inlet valve. Sometimes a loose internal connection or a clogged water line can cause leaks elsewhere in the unit.