Is there anything more frustrating than reaching for a refreshing glass of cold water or a piping hot cup for your tea, only to find your water dispenser failing to deliver? A water dispenser is a modern convenience, but when it stops providing water at your desired temperature, it can quickly become an irritating household puzzle. Don’t worry, you’re not alone in facing this common issue. This comprehensive guide will equip you with essential troubleshooting steps and maintenance tips to diagnose and resolve both cooling and heating problems, helping you restore your dispenser’s functionality and enjoy perfectly temperature-controlled water once again.
Understanding Your Water Dispenser’s Core Functions
Before diving into fixes, let’s quickly review how your water dispenser works its magic. For cold water, most dispensers utilize either a compressor-based refrigeration system, similar to a refrigerator, or a thermoelectric cooling system. Both work to absorb heat from the water, reducing its temperature. For hot water, a heating element warms a small internal tank of water to a high temperature, typically around 185-195°F (85-90°C). Crucially, thermostats regulate these processes, ensuring the water remains within the desired temperature range and preventing overheating or over-cooling.
Common Reasons Your Water Dispenser Isn’t Cooling
When your water dispenser isn’t chilling water as it should, several culprits could be at play. Identifying the root cause is the first step toward a successful fix.
Power Supply Issues
|
Our Picks for the Best Water Dispenser in 2026
As an Amazon Associate I earn from qualifying purchases.
|
||
| Num | Product | Action |
|---|---|---|
| 1 | New Wave Enviro Porcelain Water Dispenser, Classic Blue Stripe |

|
| 2 | Brio Limited Edition Top Loading Water Cooler Dispenser - Hot & Cold Water, Child Safety Lock, Holds 3 or 5 Gallon Bottles - UL/Energy Star Approved |
|
| 3 | Brio 130 Series Top-Load Water Cooler Dispenser for 3- and 5-Gallon Bottles, Hot & Cold, Spill-Free Loading, Child Safety Lock, Energy Star 3.0, Black |
|
| 4 | Brio Self Cleaning Bottom Loading Water Cooler Water Dispenser – Black Stainless Steel - 3 Temperature Settings - Hot, Room & Cold Water |
|
| 5 | Brita UltraMax Large Water Dispenser With Standard Filter, BPA-Free, Reduces Copper, Cadmium and Mercury Impurities, Lasts 2 Months or 40 Gallons, Includes 1 Filter, Kitchen Accessories, Large 27-Cup |
|
| 6 | Water Dispenser 5 Gallon Water Bottle Pump |
|
| 7 | Brio 520 UV Self-Cleaning Bottleless Water Cooler Dispenser, UL Certified - Built-in 2 Stage Filtration (2 Free Replacement Filters Included) Reduces PFAS & Microplastics - 3 Temp (Hot Cold, Room) |
|
| 8 | Water Jug Pump for 5 Gallon Bottle – Portable Electric USB-C Charging Dispenser, Dual Powerful Motors, Fast Flow, Fits 2-5 Gallon Jugs – Ideal for Home, Office, Camping, RV, Black |
|
| 9 | Igloo Top Loading Water Cooler – Hot & Cold Dispenser – Black & Stainless Steel, Holds 3 & 5 Gallon Jugs, Child Safety Lock – for Homes, Kitchens, Offices, Dorms |
|
| 10 | Brio Self Cleaning Bottom Loading Water Cooler Water Dispenser – Limited Edition - 3 Temperature Settings - Hot, Cold & Cool Water |
|
The most basic check, but often overlooked, is the power supply. A loose plug, a tripped circuit breaker, or even a faulty outlet can completely cut power to the cooling system. Ensure the dispenser is securely plugged into a functioning outlet and check your home’s breaker box for any tripped switches. The cooling function often has its own switch on the back of the unit; confirm it is in the “on” position.
Incorrect Thermostat Setting
Many water dispensers feature an adjustable thermostat for the cold water. If this is accidentally set too high or to the “off” position, your water won’t cool. Always check the thermostat dial and ensure it’s set appropriately for cold water.
Dirty Condenser Coils
Just like a refrigerator, water dispensers with compressor cooling have condenser coils, usually located at the back or bottom. Over time, these coils can accumulate dust, dirt, and pet hair, which acts as an insulator. This buildup prevents the coils from effectively dissipating heat, making the compressor work harder and leading to inefficient cooling or a complete lack of cold water.
Cooling Fan Failure
Some compressor-based units include a cooling fan to help dissipate heat from the condenser coils. If this fan is faulty, jammed, or not running, the cooling system will struggle. Listen for fan noise; if silent or obstructed, the fan motor might need replacement.
Low Refrigerant or Compressor Problems
If you notice a gradual loss of cooling and the compressor isn’t producing its usual humming sound, it could indicate low refrigerant levels or a failing compressor. Refrigerant leaks require a qualified technician for repair and recharging, and compressor issues almost always necessitate professional service or replacement.
Poor Ventilation
Water dispensers, especially those with refrigeration units, require adequate airflow around them to operate efficiently. Placing the unit too close to walls, other appliances (like ovens that emit heat), or in direct sunlight can hinder its ability to cool properly. Leave at least 4-6 inches of space around the unit for optimal ventilation.
Empty Water Bottle or Airlock
For bottled water dispensers, an empty or improperly seated water bottle can prevent water from entering the cooling reservoir. Sometimes, an airlock can form, restricting water flow. Ensure the bottle is full, correctly positioned, and free from any air bubbles.
Why Your Water Dispenser Might Not Be Heating
A lack of hot water is just as inconvenient as no cold water. Here are the common reasons your water dispenser’s heating function might be on the fritz.
Power Supply Issues
Similar to cooling problems, a heating malfunction can often be traced back to the power supply. Double-check that the dispenser is plugged in, the power outlet is working, and the hot water switch (usually on the back) is turned on. A tripped circuit breaker can also affect the heating element.
Faulty Heating Element
The heating element is the core component responsible for warming the water. If it burns out or becomes damaged, it simply won’t be able to heat the water. Signs of a faulty heating element might include no heat at all or only lukewarm water.
Malfunctioning Thermostat
The thermostat for the hot water system ensures the water reaches and maintains the desired hot temperature. If this thermostat is faulty, it may not correctly signal the heating element to turn on or regulate the temperature, leading to inconsistent heating or no heat whatsoever.
Tripped Thermal Cut-Off Switch
Most water dispensers include a thermal cut-off switch as a safety feature. This switch automatically trips and cuts power to the heating element if the unit overheats. If your dispenser isn’t heating, it’s possible this safety switch has been activated and needs to be reset (if accessible) or replaced.
Mineral Buildup (Scaling)
Hard water contains minerals that can accumulate over time, forming limescale deposits inside the heating tank and on the heating element. This scaling acts as an insulator, significantly reducing the heating element’s efficiency and causing the water to take longer to heat or not heat effectively.
Airlock in the System
An airlock occurs when air becomes trapped in the water lines, preventing water from flowing into the heating chamber. This can result in no hot water being dispensed, even if the heating element is functioning correctly.
Internal Baffle Dislodged
In some models, an internal baffle separates the hot and cold water. If this baffle becomes dislodged, it can interfere with the heating process. This is particularly common after changing a water bottle.
Step-by-Step DIY Troubleshooting Guide
Don’t rush to call a technician just yet! Many water dispenser problems can be resolved with a few simple DIY steps. Always remember to prioritize safety: unplug your water dispenser before performing any internal inspections or cleaning.
Initial Checks (Applicable to Both Cooling and Heating Issues)
- Verify Power Connection and Switches:
- Ensure the water dispenser’s power cord is securely plugged into a working electrical outlet.
- Check the circuit breaker for any tripped switches.
- Locate the separate “hot” and “cold” switches, usually found on the back of the unit, and make sure they are both in the “on” position if you desire both temperatures.
- If lights indicate power status, ensure they are lit.
- Check Water Bottle/Supply:
- For bottled dispensers, confirm the water bottle is full and correctly seated. A misaligned bottle or airlock can prevent water flow.
- For plumbed-in units, ensure the main water supply tap is open and there are no kinks in the water line.
- Perform a System Reset:
- Unplug the water dispenser from the power outlet.
- Wait for at least 30 seconds, or ideally, several minutes (some sources suggest even 12-24 hours for a full reset).
- Plug the unit back in. This can often clear minor electrical glitches or reset internal components.
- Allow 20-30 minutes for cooling/heating cycles to re-establish before testing the water temperature.
For Cooling Issues
- Clean Condenser Coils and Vents:
- Unplug the dispenser.
- Carefully move the unit away from the wall.
- Using a soft brush or vacuum cleaner, gently remove any dust, dirt, or debris from the condenser coils and air vents located at the back or bottom of the unit. Proper airflow is vital for efficient cooling.
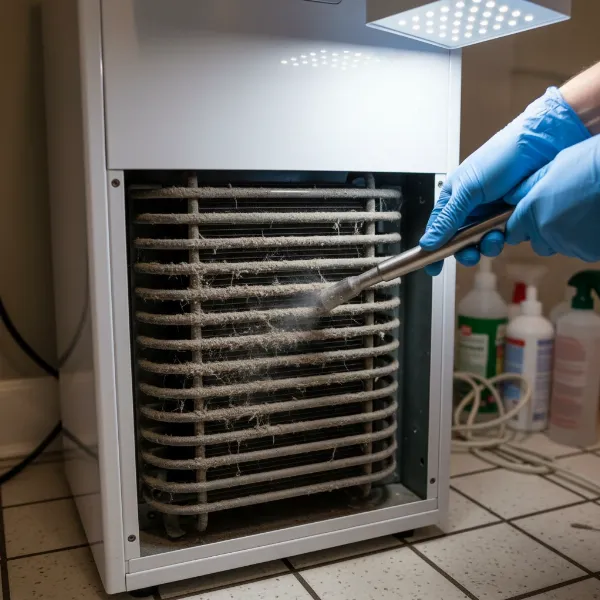 Person cleaning dirty condenser coils of a water dispenser with a vacuum cleaner.
- Ensure Adequate Ventilation:
- Once the coils are clean, make sure the dispenser has at least 4-6 inches of space on all sides and at the back to allow for proper heat dissipation. Avoid placing it in enclosed cabinets or near heat-generating appliances.
- Adjust Thermostat:
- If your unit has an adjustable cold water thermostat, ensure it is set to the lowest (coldest) setting. If it was accidentally turned up, this simple adjustment can restore cooling.
For Heating Issues
- Check Hot Water Switch/Reset Button:
- Many hot water dispensers have a separate hot water switch or a small red reset button (often recessed) near the heating element. Ensure the switch is on. If there’s a reset button, press it firmly. This can often reactivate the heating element if a thermal cut-off switch was tripped.
- Descale the Heating Tank:
- Mineral buildup is a common cause of poor heating. To descale, unplug the dispenser and drain the water.
- Fill the hot water reservoir with a solution of equal parts white vinegar and water.
- Let it sit for 15-30 minutes to dissolve mineral deposits.
- Drain the vinegar solution and rinse the reservoir thoroughly with clean water multiple times to remove any residue.
- Important: Never mix vinegar and bleach, as this creates toxic gas.
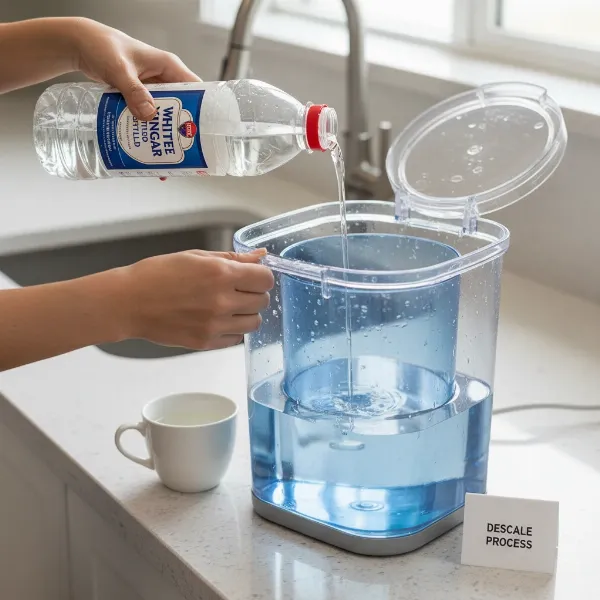 Hand pouring vinegar solution into a water dispenser's reservoir for descaling.
- Inspect for Dislodged Internal Baffle:
- If your model has an internal baffle and hot water issues started after changing a bottle, remove the bottle and visually check for a flat, circular baffle that might have come loose. Gently reseat it in the center of the well.
When to Call a Professional
While many common water dispenser problems can be solved with DIY troubleshooting, some issues are best left to the experts. Knowing when to call a professional can prevent further damage and ensure your safety.
You should seek professional assistance if you encounter:
- Compressor Failure: If the compressor is not working (no humming, water not cooling despite other checks), it typically requires specialized tools and expertise to repair or replace.
- Refrigerant Leaks: A gradual loss of cooling combined with the compressor running continuously often indicates a refrigerant leak. This is a hazardous repair that only a certified technician should handle.
- Complex Electrical Problems: While checking plugs and switches is safe, any internal wiring issues, power board malfunctions, or testing with a multimeter (beyond basic continuity checks if you’re not experienced) should be performed by a qualified electrician or appliance repair specialist.
- Persistent Issues: If you’ve tried all the DIY troubleshooting steps and your water dispenser still isn’t cooling or heating, it’s time to call in a professional for a thorough diagnosis.
Preventive Maintenance for Optimal Performance
Regular maintenance is key to extending the lifespan of your water dispenser and preventing temperature issues from arising. Proactive care can save you time and money in the long run.
- Regular Cleaning: Wipe down the exterior of your dispenser weekly. Empty and clean the drip tray frequently to prevent spills and bacterial growth.
- Internal Cleaning and Descaling: Every three to six months, perform a thorough internal cleaning of the reservoir with a water and white vinegar solution to remove mineral deposits and bacteria. Ensure you rinse thoroughly afterward.
- Filter Replacement: If your dispenser has a water filter, replace the cartridge according to the manufacturer’s recommendations (typically every six months or after a specific volume of water). A clogged filter can affect water flow and taste, and potentially contribute to other issues.
- Ensure Proper Ventilation: Always maintain adequate clear space around the back and sides of your water dispenser to allow for efficient heat exchange.
- Avoid Overloading: Do not exceed the maximum capacity of your dispenser’s reservoirs or place heavy objects on top, as this can strain components and lead to malfunctions.
- Use Correct Voltage: Ensure your water dispenser is connected to an electrical outlet that provides the correct voltage specified by the manufacturer. Incorrect voltage can lead to inefficient operation or damage.
Conclusion
A water dispenser that isn’t cooling or heating properly can disrupt your daily routine, but in many cases, a simple DIY fix is all it takes to get it back on track. By methodically checking power connections, thermostat settings, cleaning essential components like condenser coils, and performing system resets, you can often restore your dispenser’s functionality. Remember that regular cleaning and maintenance are your best defense against future problems, ensuring you always have access to clean, perfectly temperature-controlled water.
What’s your go-to trick for keeping your water dispenser in top shape?
Frequently Asked Questions
Why is my water dispenser not heating even when the hot switch is on?
If the hot switch is on but your water dispenser isn’t heating, common causes include a faulty heating element, a malfunctioning thermostat, or a tripped thermal cut-off switch. Mineral buildup (scaling) in the heating tank can also reduce efficiency. Try resetting the unit by unplugging it for 10-15 minutes and then replugging it, and consider descaling the heating tank with a vinegar solution.
How often should I clean my water dispenser to prevent cooling/heating issues?
It is generally recommended to clean your water dispenser thoroughly every three to six months. This includes cleaning the exterior, drip tray, and especially the internal reservoirs with a food-safe cleaning solution like white vinegar and water. Regular cleaning prevents mineral buildup and bacterial growth that can impair both heating and cooling functions.
Can I fix a water dispenser with a refrigerant leak myself?
No, fixing a water dispenser with a refrigerant leak is not a DIY task and should never be attempted by an untrained individual. Refrigerant is a specialized chemical that requires specific handling, tools, and environmental regulations. Attempting to repair a leak yourself can be dangerous and cause further damage to the unit or harm to yourself. It’s best to contact a qualified technician.
What does it mean if my water dispenser makes a humming noise but no cold water comes out?
A humming noise usually indicates that the compressor is running. If it’s humming but not producing cold water, it could suggest low refrigerant levels, a cooling fan failure, dirty condenser coils preventing heat dissipation, or a faulty thermostat that isn’t signaling the compressor effectively. Check for dirty coils and proper ventilation first, then consider professional inspection for refrigerant or compressor issues.
Is it safe to use a water dispenser if it’s not heating or cooling?
While a dispenser that’s only providing room-temperature water is generally safe to drink (assuming the water source is safe and the dispenser is clean), it’s not recommended to continue using the heating or cooling functions if they are malfunctioning. A non-heating element could be a fire hazard, and a non-cooling unit might develop bacterial growth if water sits at ambient temperatures for too long. Addressing the problem promptly is advisable for both safety and optimal performance.