Discovering a puddle of water around your water dispenser can be frustrating and even alarming. A leaking water dispenser not only creates a mess but can also indicate a deeper issue that needs immediate attention to prevent further damage or potential safety hazards. As an expert in water filtration systems and dispensers, I understand the common culprits behind these unwelcome drips and how to tackle them effectively. This guide will walk you through identifying the source of the leak and provide practical troubleshooting steps to help you restore your water dispenser to optimal, leak-free operation.
First Steps: Safety and Initial Inspection
Before attempting any troubleshooting, safety is paramount. Always unplug your water dispenser from the power outlet to avoid electrical shock, especially if water has pooled near electrical components. Thoroughly clean up any spilled water to prevent slips and electrical hazards.
Once safe, your immediate task is to pinpoint where the water is coming from. Observe your dispenser carefully: Is the leak originating from the top where the bottle sits, dripping from the spigots, pooling at the base, or coming from the back? The location of the leak often provides crucial clues about the underlying problem. A methodical inspection will save you time and help you apply the correct fix.
Common Causes of Water Dispenser Leaks and How to Fix Them
Water dispensers, whether top-loading, bottom-loading, or plumbed-in, share several common points where leaks can occur. Understanding these and knowing how to address them can often resolve the issue without professional help.
Faulty Water Bottle or Improper Seating
|
Our Picks for the Best Water Dispenser in 2026
As an Amazon Associate I earn from qualifying purchases.
|
||
| Num | Product | Action |
|---|---|---|
| 1 | Brita UltraMax Large Water Dispenser With Standard Filter, BPA-Free, Reduces Copper, Cadmium and Mercury Impurities, Lasts 2 Months or 40 Gallons, Includes 1 Filter, Kitchen Accessories, Large 27-Cup |

|
| 2 | New Wave Enviro Porcelain Water Dispenser, Classic Blue Stripe |
|
| 3 | Brio 130 Series Top-Load Water Cooler Dispenser for 3- and 5-Gallon Bottles, Hot & Cold, Spill-Free Loading, Child Safety Lock, Energy Star 3.0, Black |
|
| 4 | Brio 520 UV Self-Cleaning Bottleless Water Cooler Dispenser, UL Certified - Built-in 2 Stage Filtration (2 Free Replacement Filters Included) Reduces PFAS & Microplastics - 3 Temp (Hot Cold, Room) |
|
| 5 | Brio Self Cleaning Bottom Loading Water Cooler Water Dispenser – Limited Edition - 3 Temperature Settings - Hot, Cold & Cool Water |
|
| 6 | Water Jug Pump for 5 Gallon Bottle – Portable Electric USB-C Charging Dispenser, Dual Powerful Motors, Fast Flow, Fits 2-5 Gallon Jugs – Ideal for Home, Office, Camping, RV, Black |
|
| 7 | Water Dispenser 5 Gallon Water Bottle Pump |
|
| 8 | Brio Self Cleaning Bottom Loading Water Cooler Water Dispenser – Black Stainless Steel - 3 Temperature Settings - Hot, Room & Cold Water |
|
| 9 | Brio Limited Edition Top Loading Water Cooler Dispenser - Hot & Cold Water, Child Safety Lock, Holds 3 or 5 Gallon Bottles - UL/Energy Star Approved |
|
| 10 | Igloo Top Loading Water Cooler – Hot & Cold Dispenser – Black & Stainless Steel, Holds 3 & 5 Gallon Jugs, Child Safety Lock – for Homes, Kitchens, Offices, Dorms |
|
One of the most frequent causes of a leak, especially in bottled water dispensers, is a problem with the water bottle itself or how it’s placed. A small crack or pinhole in the bottle, often invisible to the naked eye, can cause the dispenser’s reservoir to overfill, leading to an overflow. Similarly, if the bottle is not seated correctly on the dispenser’s probe, it can create a poor seal, allowing water to escape.
How to Fix:
First, remove the current water bottle and inspect it thoroughly for any visible cracks or damage. Even a tiny imperfection can cause significant leakage. If you find any damage, replace the bottle. If the bottle appears fine, ensure you reseat it properly, applying gentle pressure to create a tight seal with the dispenser’s probe. Many issues resolve simply by trying a fresh, undamaged bottle.
Loose or Damaged Spigots (Taps)
The spigots, or taps, are the points where you dispense water. Over time, these can become loose, or their internal components, such as washers or packing nuts, can wear out or become misaligned. This often results in a continuous drip from the tap even when it’s closed.
How to Fix:
Check the spigot caps first and tighten them clockwise if they feel loose. If dripping persists, you may need to tighten the packing nut located behind the spigot handle. Consult your dispenser’s manual for specific instructions, as this might require a wrench and careful handling. If tightening doesn’t stop the leak, the internal washer might be worn and require replacement.
Trapped Air in the System
When a new water bottle is installed, or after a dispenser has been moved, air can become trapped within the internal lines and reservoir. This trapped air can increase pressure inside the system, forcing water out through small openings, sometimes making it appear as if the unit has an internal leak.
How to Fix:
To release trapped air, firmly press and hold down both the hot and cold water spigots (if applicable) for a minute or two, or until water flows consistently without sputtering. You might need to dispense a few gallons of water to fully purge the air from the system.
Clogged or Frozen Water Lines, Reservoir, or Filter
Blockages or ice buildup can severely disrupt the normal flow of water within your dispenser. A clogged water filter, for instance, can restrict water flow, causing pressure to build up and potentially leading to leaks. Similarly, if internal water lines or the reservoir freeze, the expansion of ice can crack components or block pathways, resulting in leaks once thawed.
How to Fix:
If you suspect a frozen component, unplug the dispenser and allow it to defrost completely for several hours or overnight. Ensure the unit is in a room temperature environment. If a clogged filter is the issue, replace it according to the manufacturer’s instructions. For general clogs in lines or the reservoir, careful cleaning might be necessary, though internal clogs often require professional attention.
Loose or Damaged Water Lines/Connections
For plumbed-in water dispensers, or even within bottled units, water lines and their connections can become loose, cracked, or damaged over time. This can happen due to regular wear, accidental knocks, or vibrations. A loose connection means water can seep out, while a crack in the tubing will cause a more direct leak.
How to Fix:
Visually inspect all visible water lines and connections for any signs of damage, cracks, or corrosion. If a connection is loose, gently tighten it. If a line is visibly damaged or cracked, it will need to be replaced. This might require specialized tools or components, so consider professional help if you’re unsure.
Overflowing Drip Tray
Often, what appears to be a leak from the base of the dispenser is simply an overflowing drip tray. This tray collects minor drips and spills from the spigots and, if not emptied regularly, can overflow, creating a puddle that mimics a more serious internal leak.
How to Fix:
Regularly check and empty the drip tray. Clean it thoroughly to prevent mold or bacterial growth. Ensure it is correctly seated back into its position after cleaning.
Faulty Water Inlet Valve
The water inlet valve controls the flow of water into the dispenser’s reservoir. If this valve becomes faulty, damaged, or stuck open, it can lead to an uncontrolled flow of water and subsequent leaks. Diagnosing a faulty inlet valve can be tricky without specialized knowledge.
How to Fix:
A faulty water inlet valve usually requires replacement. This is typically a more advanced repair that might be best handled by a qualified technician. Attempting to repair it yourself without the proper expertise could lead to further damage.
Baffle or Float Sensor Issues (Bottom-Loading Units)
Bottom-loading water dispensers use a pump and a float sensor, often integrated with a baffle, to draw water from the bottle and maintain the correct level in the internal reservoir. If the baffle is loose or disconnected, or the float sensor malfunctions, the pump might continuously draw water, causing the reservoir to overfill and leak.
How to Fix:
For bottom-loading units, remove the water bottle and access the reservoir area. Check if the baffle is securely attached to the water inlet in the center of the reservoir. Push it down firmly to ensure it’s properly seated. If the problem persists, it may indicate a malfunctioning float sensor or pump, which usually warrants professional repair.
Internal Components & Limescale Buildup
Less visible but equally problematic are issues with internal components like a cracked reservoir, worn-out seals, or significant limescale buildup. Limescale, or mineral deposits, can accumulate in pipes, filters, and valves over time, leading to blockages and component deterioration, which can cause leaks.
How to Fix:
Internal cracks or severely worn seals generally require professional repair or component replacement. For limescale buildup, regular descaling procedures can help. Many manufacturers provide guidelines for descaling, often involving a solution of water and white vinegar. This preventative measure can extend the life of your dispenser and prevent future leaks.
> “The majority of water dispenser leaks are minor and can be fixed with simple troubleshooting, but ignoring even a small drip can lead to bigger problems down the line.” – John Smith, Senior Water Dispenser Technician
Troubleshooting Summary Table
| Leak Symptom | Potential Cause | Recommended Solution |
|---|---|---|
| Water at dispenser base | Overflowing drip tray | Empty and clean drip tray. |
| Faulty water bottle or improper seating | Inspect/replace bottle, reseat properly. | |
| Loose/damaged water line (internal) | Unplug, inspect internal lines, tighten/replace if accessible. | |
| Baffle/float sensor issue (bottom-load) | Realign baffle, professional repair for sensor. | |
| Dripping from spigot | Loose spigot caps or packing nut | Tighten spigot caps or packing nut. |
| Worn washer/seal in spigot | Replace washer/seal (may require disassembly). | |
| Leak from top/back | Trapped air in system | Dispense 2-3 gallons of water from hot & cold spigots. |
| Clogged/frozen water line/filter | Defrost unit, clean/replace filter. | |
| Loose water lines/connections | Inspect external lines, tighten connections. | |
| Continuous water flow | Faulty water inlet valve | Professional repair/replacement of valve. |
| Internal reservoir crack | Professional repair/replacement of reservoir. |
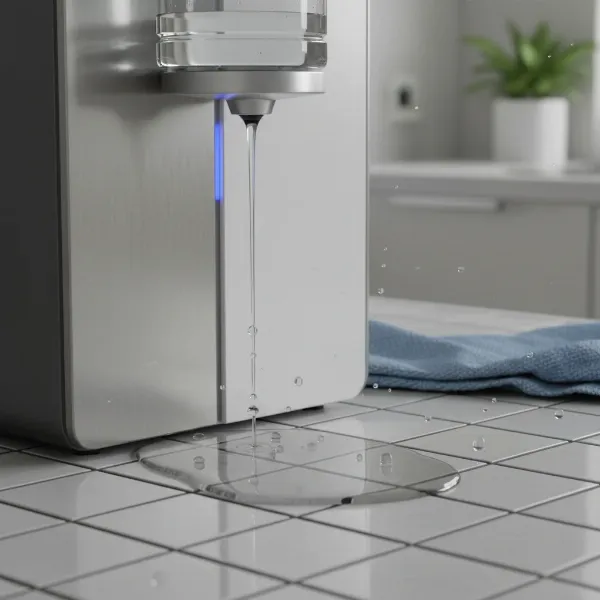 A close-up of a water dispenser leaking onto a kitchen floor, showing a small puddle forming, symbolizing a common household problem.
When to Call a Professional
While many water dispenser leaks can be resolved with simple DIY troubleshooting, there are instances when professional assistance is necessary. If you’ve tried the common fixes and the leak persists, or if you identify a problem that requires specialized tools, internal disassembly, or handling of electrical components, it’s time to call a qualified technician. Ignoring serious internal leaks can lead to water damage, mold growth, and potentially hazardous electrical issues. A professional can accurately diagnose complex problems like a malfunctioning water pump, a cracked internal reservoir, or a deeply embedded clog, ensuring a safe and lasting repair.
Preventative Maintenance to Avoid Leaks
Regular maintenance is key to prolonging the life of your water dispenser and preventing future leaks. A clean and well-maintained unit is less likely to develop issues.
- Regular Cleaning: Periodically clean the drip tray, spigots, and external surfaces. For bottled dispensers, clean the bottle probe area.
- Descaling: If you live in an area with hard water, descaling the internal components every few months can prevent mineral buildup that leads to clogs and deterioration.
- Proper Bottle Handling: Always handle water bottles carefully to avoid cracks and ensure they are seated correctly and firmly on the dispenser to prevent stressing the seal.
- Check Connections: For plumbed-in units, periodically inspect water line connections for any signs of loosening or wear.
- Monitor Water Flow: Pay attention to any changes in water flow or taste, as these can be early indicators of a developing problem.
Conclusion
A leaking water dispenser doesn’t have to be a major crisis. By systematically investigating the source and applying the appropriate troubleshooting steps, you can often resolve the issue yourself. Remember to prioritize safety by unplugging the unit before starting any inspection or repair. From checking for a faulty water bottle to tightening loose spigots or addressing trapped air, many common leaks have straightforward solutions. However, don’t hesitate to seek professional help for persistent or complex internal issues. Regular preventative maintenance, including cleaning and proper handling, is your best defense against future leaks, ensuring your water dispenser continues to provide convenient, clean hydration for years to come. What preventative steps will you take this week to keep your water dispenser running smoothly?
Frequently Asked Questions
Why is my bottom-loading water dispenser leaking from the bottom?
A leak from the bottom of a bottom-loading dispenser often points to an issue with the water bottle itself, a loose or malfunctioning baffle, or a problem with the float sensor that regulates water levels in the internal reservoir. Check the bottle for cracks and ensure the baffle is securely in place.
How often should I clean my water dispenser to prevent leaks?
Aim for a thorough cleaning of your water dispenser, including descaling if applicable, every 3-6 months. Regular cleaning prevents mineral buildup and ensures components like spigots and reservoirs remain free from obstructions that could lead to leaks.
Can a cheap water bottle cause a dispenser to leak?
Yes, lower-quality or damaged water bottles are more prone to developing hairline cracks or pinholes. These imperfections can lead to constant dripping or overflowing within the dispenser’s reservoir, mimicking an internal leak. Always inspect bottles for damage before use.
Is it safe to use a leaking water dispenser temporarily?
It is generally not recommended to use a leaking water dispenser, even temporarily. A leak, regardless of its size, can indicate a potential electrical hazard if water comes into contact with wiring, and it can also cause water damage to your floors or surrounding furniture. Unplug the unit and address the leak promptly.
What are the signs of a serious internal leak?
Signs of a serious internal leak include water pooling consistently even after checking external components, water leaking from the back or sides of the unit (not just the spigots or drip tray), or an unusual noise accompanied by the leak. These often indicate issues with internal tubing, reservoirs, or valves that require professional attention.