Imagine a continuous flow of pure, refreshing water, available hot or cold, without the hassle of heavy bottles or constant reordering. That’s the promise of a bottleless water cooler. Many people hesitate, however, wondering if installing such a system is a complicated plumbing nightmare. The good news is, for most homeowners, a DIY bottleless water cooler installation is a surprisingly straightforward task that you can confidently complete in an afternoon. This guide will walk you through every step, transforming that daunting perception into a satisfying do-it-yourself accomplishment.
Dispelling the Myth: DIY Installation is Simpler Than You Think
The idea of connecting an appliance directly to your home’s water supply can feel intimidating, but bottleless water cooler manufacturers have designed these systems with user-friendly installation in mind. Most models come with comprehensive step-by-step manuals, and many even include the necessary parts and tools to get you started. You don’t typically need advanced plumbing skills or specialized equipment to achieve a professional-looking and functioning setup. The process primarily involves turning off your water, making a few secure connections, and priming the system.
What You’ll Need for the Job
Before you begin, gather a few essential items to ensure a smooth installation. Having everything at hand will prevent interruptions and make the process more efficient.
Essential Tools
- Adjustable Wrench: For tightening connections to prevent leaks.
- Screwdriver (Phillips and/or Flathead): May be needed for access panels or securing tubing clips.
- Utility Knife or Scissors: Useful for cutting the flexible water tubing to the desired length for a neat run.
- Bucket and Towels: To catch any drips when disconnecting water lines.
|
Our Picks for the Best Water Dispenser in 2026
As an Amazon Associate I earn from qualifying purchases.
|
||
| Num | Product | Action |
|---|---|---|
| 1 | Primo Bottom-Loading Self-Sanitizing Water Dispenser - 2 Temp (Hot-Cold) Water Cooler Water Dispenser for 5 Gallon Bottle w/Child Safety Lock, Black and Stainless Steel |

|
| 2 | Brio 130 Series Top-Load Water Cooler Dispenser for 3- and 5-Gallon Bottles, Hot & Cold, Spill-Free Loading, Child Safety Lock, Energy Star 3.0, Black |
|
| 3 | Brio Commercial Grade Bottleless Ultra Safe Reverse Osmosis Drinking Water Filter Water Cooler Dispenser-3 Temperature Settings Hot, Cold & Room Water - UL Approved – Point of Use |
|
| 4 | Brio Countertop Self Cleaning Bottleless Water Cooler Dispenser with Filtration - Hot Cold and Room Temperature Water. Free Extra Replacement Filters Included - UL/Energy Star Approved |
|
| 5 | Igloo Top Loading Water Cooler with Removable Tray & Energy-Saving Features - Water Tower with Hot, Cold Temperature Settings- Water Dispenser Fits 3 & 5-Gallon Jugs with Child Safety Lock- Stainless |
|
| 6 | Brio Bottom Loading Water Cooler Dispenser for 5 Gallon Bottles - 3 Temperatures with Hot, Room & Cold Spouts, Child Safety Lock, LED Display with Empty Bottle Alert, Stainless Steel |
|
| 7 | Brita UltraMax Large Water Dispenser With Standard Filter, BPA-Free, Reduces Copper, Cadmium and Mercury Impurities, Lasts 2 Months or 40 Gallons, Includes 1 Filter, Kitchen Accessories, Large 27-Cup |
|
| 8 | Housiwill Countertop Water Dispenser, Top Loading Water Cooler for 1.2 to 5 Gallon, 3 Temperature Settings Room Temperature Water Cold Hot Water Dispenser, Suitable for Home, Office, Dorm Bedside Use |
|
| 9 | Brio Limited Edition Top Loading Water Cooler Dispenser - Hot & Cold Water, Child Safety Lock, Holds 3 or 5 Gallon Bottles - UL/Energy Star Approved |
|
| 10 | Water Jug Pump for 5 Gallon Bottle – Portable Electric USB-C Charging Dispenser, Dual Powerful Motors, Fast Flow, Fits 2-5 Gallon Jugs – Ideal for Home, Office, Camping, RV, Black |
|
Components (Often Included in Your Cooler’s Kit)
- T-shaped Feed Water Adapter: This component allows you to tap into your existing cold water line.
- 1/4-inch Water Tubing: The flexible line that connects the adapter to your water cooler.
- Shut-off Valve: An inline valve for the cooler’s water line, providing an easy way to stop water flow to the unit without turning off your main supply.
- Water Filters: Your cooler will come with the initial set of filters.
- User Manual: Always refer to your specific model’s instructions, as details can vary.
Site Prerequisites
- Cold Water Line Access: Typically found under a kitchen sink or near a refrigerator.
- Grounded Electrical Outlet: Within six feet of your chosen cooler location.
- Level, Sturdy Surface: The cooler needs to sit securely and level to function correctly.
- Clearance: Ensure adequate space around the cooler for ventilation and filter changes.
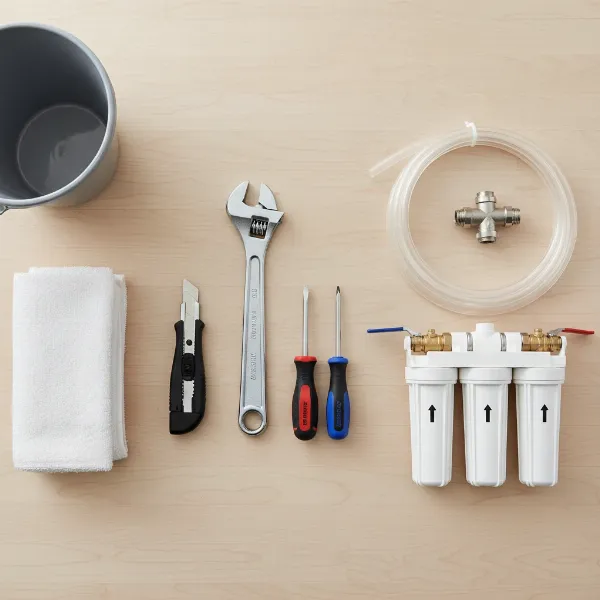 Essential tools and components for bottleless water cooler DIY installation
Step-by-Step DIY Installation Guide
With your tools and components ready, let’s dive into the installation process. Taking your time and following each step carefully will lead to a successful setup.
1. Preparation and Placement
First, select the ideal spot for your bottleless water cooler. It should be on a stable, flat surface near a cold water line and an electrical outlet. Ensure there’s enough room behind and around the unit for proper ventilation and future maintenance. Avoid placing it in direct sunlight or next to heat sources, which can affect its cooling efficiency.
2. Turn Off the Water Supply
This is a critical first step to prevent any unexpected floods. Locate the cold water shut-off valve under your sink (or the main water supply to your home if installing elsewhere) and turn it off completely. Open the cold water faucet to drain any remaining water from the line and relieve pressure. Have your bucket and towels ready for any residual drips.
3. Connect to Your Water Line
Now, you’ll tap into your cold water supply.
- Disconnect: Carefully disconnect the existing cold water line from your faucet or fixture. This is where the adjustable wrench comes in handy.
- Install T-Adapter: Screw the T-shaped feed water adapter onto the cold water supply valve. Ensure it’s hand-tight, then use your wrench to tighten it about a quarter turn further, being careful not to overtighten.
- Reconnect Faucet Line: Attach your faucet’s cold water supply line to the top of the newly installed T-adapter.
- Connect Cooler Line: Insert one end of the 1/4-inch water tubing into the quick-connect fitting on the T-adapter. Push firmly until it’s fully seated. Install the inline shut-off valve onto the other end of the tubing, then connect this tubing to the corresponding inlet on your bottleless water cooler.
- Important Tip: Always connect to the cold water line. Hot water can severely damage your cooler’s filtration system. Make sure all connections are secure by gently tugging on the lines.
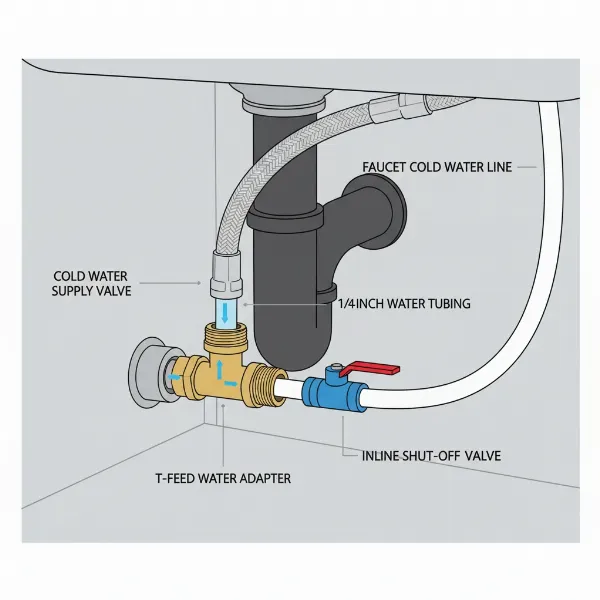 Detailed illustration of connecting a bottleless water cooler to a cold water line.
4. Install and Prime Filters
Your water cooler’s filters are vital for providing clean, great-tasting water. Follow your manufacturer’s specific instructions for installing and priming them. This often involves flushing the filters with water before connecting them entirely to the cooler to remove any carbon dust or air. Many kits include a priming adapter for this purpose. Once primed, insert the filters into their designated compartments in the cooler.
5. Check for Leaks
Before proceeding, slowly turn the cold water supply back on at the shut-off valve. Carefully inspect all connections you’ve made for any signs of leakage. A small drip can become a big problem, so ensure everything is dry and secure. If you find a leak, turn off the water, tighten the connection, and re-check. Once you’re certain there are no leaks, open the inline shut-off valve to the cooler.
6. Power Up Your Cooler and Flush the System
Only after all water connections are secure and leak-free should you plug your bottleless water cooler into the grounded electrical outlet. Turn on the cooler’s power switch. The cooler will begin to fill its internal tanks and run water through the filtration system. For the first use, dispense several liters of water through both the hot and cold spigots. This flushes out any remaining air from the lines and residual carbon dust from the new filters, ensuring optimal water quality.
Common Challenges and Quick Fixes
Even with a straightforward installation, you might encounter minor hiccups. Don’s let these deter you; most are easily resolved.
- Leaking Connections: The most common issue. Double-check that all fittings are tightly secured. Sometimes, a connection just needs an extra snug turn with your wrench. If plastic tubing is involved, ensure it’s cut cleanly and inserted fully into quick-connect fittings.
- Low Water Pressure: If water flow is weak, confirm your main water supply is fully open and the cooler’s inline shut-off valve is open. Also, ensure your filters are installed correctly and not clogged. In rare cases, if your home’s water pressure is inherently very low, a booster pump might be necessary, but this is uncommon for standard residential installations.
- Cooler Not Dispensing Water: Verify the unit is plugged in and powered on. Check that the inline shut-off valve is open and that the water supply to the cooler is on. Air trapped in the lines can also prevent dispensing; try flushing the system again.
When to Call a Professional
While most bottleless water cooler installations are DIY-friendly, there are instances when professional help is advisable. If you encounter complex plumbing configurations, have older pipes that are prone to issues, or simply don’t feel confident in your ability to perform the installation, don’t hesitate to call a certified plumber. Their expertise can ensure a safe and efficient setup, giving you complete peace of mind.
“A well-prepared DIY enthusiast can absolutely install a bottleless water cooler. The key is to read your specific model’s instructions thoroughly and ensure all water connections are leak-free before plugging in the unit.” – Alex Nguyen, Senior Water Filtration Technician
Conclusion
Installing a bottleless water cooler doesn’t have to be a daunting task. By following these clear steps and understanding the basics, you can confidently set up your new appliance and start enjoying an endless supply of purified water. Not only will you save money and reduce plastic waste, but you’ll also gain the satisfaction of a successful home improvement project. So, are bottleless water coolers hard to install? Not if you’re prepared and follow a good guide.
Ready to take the plunge and enjoy the convenience of filtered water on demand?
Frequently Asked Questions
Can I connect a bottleless water cooler to a hot water line?
No, you should only connect a bottleless water cooler to a cold water supply line. Connecting to a hot water line can damage the cooler’s internal filtration system and other components, leading to malfunctions and potential leaks.
How long does it typically take to install a bottleless water cooler?
For an average DIYer, installing a bottleless water cooler usually takes between 30 minutes to 1 hour, assuming all tools are ready and there are no unexpected plumbing issues. Initial flushing of the system may take an additional 10-15 minutes.
Do bottleless water coolers come with everything needed for installation?
Most bottleless water coolers come with an installation kit that includes essential components like the T-adapter, water tubing, and a shut-off valve. However, you will typically need your own basic tools such as an adjustable wrench and screwdriver. Always check the product description for specifics.
How often do I need to change the filters in a bottleless water cooler?
Filter replacement frequency varies by model and water usage, but generally, filters should be changed every 6 to 12 months, or after a specific volume of water (e.g., 1,500 gallons), as recommended by the manufacturer. Regular filter changes ensure optimal water quality and cooler performance.
What should I do if my bottleless water cooler is leaking after installation?
If your bottleless water cooler is leaking, immediately turn off the water supply to the unit. Then, re-examine all connections, tightening any that seem loose. Ensure the water tubing is fully inserted into quick-connect fittings. If leaks persist after tightening, consult your cooler’s troubleshooting guide or contact customer support.